FREE DINNER EBOOK!
Get your copy!
Cookie Policy
GDPR Policy
Disclaimer
Terms Of Use
Visit my other site:
Fun Cookie Recipes
Home
Dinner
Desserts
Drinks
Appetizers
Contact
About
Privacy Policy
Home
Dinner
Desserts
Drinks
Appetizers
Contact
About
Privacy Policy
Cookie Policy
GDPR Policy
Disclaimer
Terms Of Use
Visit my other site:
Fun Cookie Recipes
HOME / CATEGORIES /
Latest
Strawberry Spinach Pasta Salad Fresh and Flavorful Dish
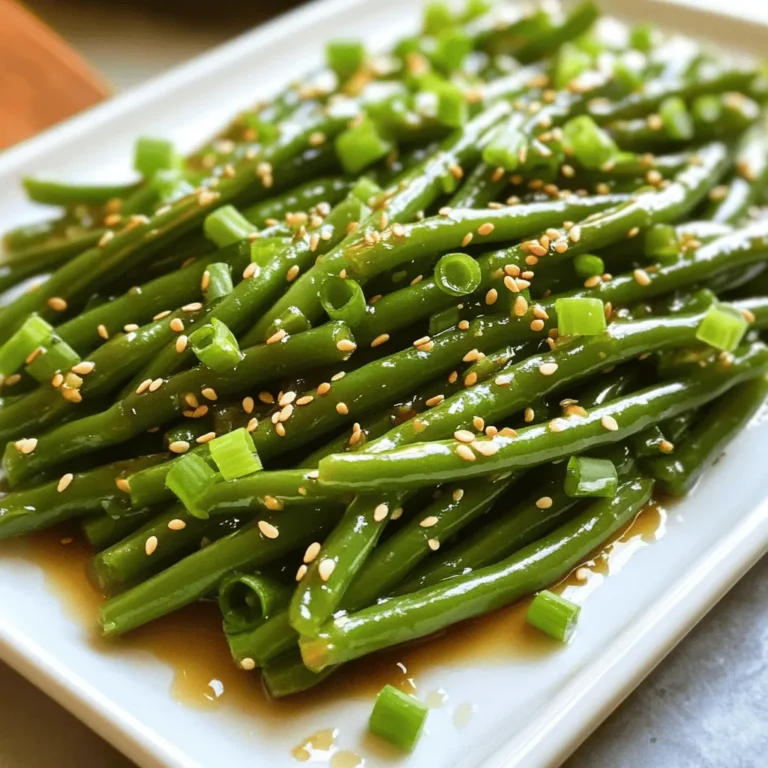
Sesame Soy Glazed Green Beans Flavorful Side Dish
Parmesan Herb Hasselback Potatoes Crispy and Flavorful
Parmesan Crusted Tilapia Tasty and Simple Dinner Idea
Taco Pasta Skillet Simple and Flavorful One-Pan Meal
Crispy Air Fryer Chickpeas Flavorful Snack Recipe

![- 8 oz fusilli pasta - 4 cups fresh spinach, roughly chopped - 2 cups ripe strawberries, hulled and sliced - 1/2 cup feta cheese, crumbled - 1/4 cup walnuts, toasted and coarsely chopped - 1/2 red onion, thinly sliced - 1/4 cup balsamic vinaigrette - Sea salt and freshly cracked black pepper, to taste When choosing pasta for this salad, fusilli works great. It holds the dressing well. You can use penne or rotini if you prefer. For a gluten-free option, try gluten-free pasta. It tastes good too! Each main ingredient brings health benefits. Spinach is rich in vitamins A and C. Strawberries are packed with antioxidants and fiber. Walnuts add healthy fats and protein. Feta cheese gives a nice flavor and calcium. This salad is vegetarian. If you need a vegan version, swap feta for a plant-based cheese. Gluten-free pasta makes it suitable for those with gluten intolerance. Enjoy this dish with good food and good friends! For the full recipe, check out the details above. Cooking the pasta: Tips for perfect al dente texture To cook fusilli pasta, start with a large pot of water. Add salt to the water. Bring the water to a boil. Add the pasta and stir it gently. Cook for 8-10 minutes. Check for al dente by tasting a piece. It should be firm but not hard. Once done, drain the pasta. Rinse it under cold water right away. This stops the cooking. Let it cool while you prepare the salad. Mixing the salad: Techniques for even distribution In a big bowl, combine the cooled pasta with fresh spinach, strawberries, feta cheese, walnuts, and red onion. I like to add each item slowly. This way, you can see how it looks. Use clean hands or a large spoon to mix it gently. Make sure each ingredient is spread out evenly. This helps every bite taste great. Dressing the salad: How to achieve the right balance of flavors Now it’s time to dress the salad. Drizzle the balsamic vinaigrette over the mixed salad. Use salad tongs or a spoon to toss everything gently. You want all the ingredients to be coated well. Taste the salad and add sea salt and freshly cracked black pepper to your liking. Mix it again to blend the seasonings. Let the salad sit for about 10 minutes before serving. This lets the flavors blend and taste even better. For the full recipe, check out the details above. - What are the best sides to accompany the salad? This salad pairs well with grilled chicken or fish. You can also serve it with crusty bread. These sides enhance the meal without overpowering the salad’s fresh flavors. - What is the ideal serving temperature? Serve this salad chilled or at room temperature. Chilling it helps the flavors blend while keeping the salad crisp and fresh. - What are some presentation hacks for an impressive dish? Use a colorful bowl to make the salad pop. Garnish with extra strawberry slices and crumbled feta. This adds visual appeal and makes it look gourmet. - How can you prevent sogginess in the salad? Rinse the pasta under cold water after cooking. This stops the cooking process and helps keep it firm. Use fresh ingredients and add dressing just before serving. - How can you adjust flavors to suit personal tastes? Feel free to add more or less feta cheese, walnuts, or strawberries. You can also try different dressings to find your favorite flavor balance. - What are the benefits of using fresh vs. frozen ingredients? Fresh ingredients bring bright flavors and better texture. Frozen ingredients can work in a pinch, but they may not have the same taste or crunch. Always choose fresh when you can. For the complete recipe, check out the [Full Recipe]. {{image_4}} You can add fun proteins to the salad. Chicken, shrimp, or tofu all work well. They boost flavor and make the dish heartier. Other fruits can add a twist. Try blueberries, raspberries, or even peaches. Nuts bring crunch. Almonds or pecans are great options. Switching up the dressing can change the taste. Try a honey mustard, a creamy ranch, or even a zesty lemon vinaigrette. Each brings its own flavor to the mix. Using fresh, seasonal ingredients can elevate your salad. In summer, add ripe tomatoes or cucumber. In fall, try roasted butternut squash or apples. These additions keep the dish fresh and exciting. For holidays, think theme! In winter, add pomegranate seeds for color. In spring, toss in some fresh herbs like basil or mint. You can even use festive colors to create a holiday look. For the full recipe, you can check back to create this vibrant dish. To keep your Strawberry Spinach Pasta Salad fresh, store it in an airtight container. This helps to seal in moisture and flavor. Place the salad in the fridge right after serving. If you have leftover dressing, store it separately to avoid sogginess. Reheating isn't necessary for this salad, as it tastes best cold. If you prefer it warm, gently heat the pasta only, then mix it back into the salad. When stored properly, this salad stays fresh for about 3 days in the fridge. Always check for signs of spoilage. Look for wilting spinach, mushy strawberries, or an off smell. If any of these signs appear, it's best to discard the salad to ensure safety. For more detailed instructions, refer to the [Full Recipe]. Can I make this salad ahead of time? Yes, you can prepare the salad a few hours in advance. Just keep the dressing separate until serving. This helps keep the ingredients fresh and crisp. What can I substitute for feta cheese? You can use goat cheese or even a dairy-free cheese. These options give a nice flavor and texture to the salad. How do I make a vegan version of this salad? To make it vegan, skip the feta cheese and use a vegan dressing. You can add extra nuts or seeds for protein. Is it possible to freeze this salad? I do not recommend freezing this salad. The pasta and fresh veggies will become mushy when thawed. What to do if the salad is too salty? If your salad is too salty, add more spinach or pasta. This will help balance the flavor. How to manage excess dressing? If you have too much dressing, try adding more pasta or greens. Toss everything well to mix. What if my strawberries are not sweet? If your strawberries lack sweetness, drizzle a bit of honey or agave on them. This will enhance their flavor nicely. This blog post covered all the key steps to create a delicious strawberry spinach pasta salad. We explored ingredients, cooking methods, and storage tips to keep your dish fresh. Remember, you can customize the salad with proteins or seasonal items to make it your own. Don't forget to consider dietary needs as well. With these guidelines, you can impress everyone at the table. Enjoy making your salad and sharing it with friends and family!](https://magicinthedish.com/wp-content/uploads/2025/07/284b13be-8486-4c7e-8205-c4c1d95450e7-768x768.webp)
![To make Parmesan Herb Hasselback Potatoes, you need the following ingredients: - 4 medium-sized russet potatoes - 1/4 cup extra virgin olive oil - 1/2 cup freshly grated Parmesan cheese - 2 teaspoons dried oregano - 2 teaspoons dried thyme - 2 teaspoons garlic powder - Sea salt and freshly cracked black pepper to taste - Fresh parsley, finely chopped (for garnish) Each ingredient plays a key role in building flavor. The russet potatoes provide a fluffy inside and a crispy skin. Olive oil adds richness and helps the herbs stick. Parmesan cheese gives a sharp, salty bite that enhances the potatoes. The oregano and thyme bring warmth and earthiness. Garlic powder adds depth without being overpowering. Finally, parsley not only brightens the dish but also adds a fresh finish. For the full recipe and step-by-step instructions, check out [Full Recipe]. 1. Preheat the oven to 425°F (220°C). This high heat gives the potatoes a nice crisp. 2. Rinse the potatoes under cold water to remove dirt. After washing, dry them with a towel. 1. Take one potato and place it on a cutting board. 2. Use wooden chopsticks on each side for guidance. This helps you avoid cutting all the way through. 3. Carefully slice the potato into thin cuts, about 1/8 inch apart. Stop just before the bottom. Repeat this for all potatoes. 1. In a small bowl, combine 1/4 cup of olive oil, 2 teaspoons of oregano, 2 teaspoons of thyme, and 2 teaspoons of garlic powder. 2. Add sea salt and pepper to taste. Mix well until combined. 1. Brush the olive oil mixture over the potatoes. Make sure it seeps into the cuts. 2. Sprinkle 1/2 cup of freshly grated Parmesan cheese on top, letting it fill the sliced areas. 3. Place the potatoes on a baking sheet lined with parchment paper. Bake for 45 to 50 minutes. Look for a golden brown color and crispy edges. 4. After baking, remove them from the oven and cool for a few minutes. Serve warm, garnished with fresh parsley. For the complete recipe, check out the [Full Recipe]. To get those perfect crispy edges, bake at 425°F (220°C). This high heat helps create a golden crust. Using parchment paper is key. It prevents sticking and makes for easy cleanup. Plus, it helps the heat circulate around the potatoes. You can switch up the herbs and spices for your taste. Try rosemary or basil for a fresh twist. If you want more depth, add smoked paprika or a pinch of cayenne. For cheese lovers, consider mixing in some Gruyère or cheddar. These options add a new layer of flavor. Presentation is essential. Serve the potatoes on a rustic wooden or ceramic platter. This highlights their golden, crispy edges. Add fresh parsley around them for color. They pair well with roasted chicken, grilled veggies, or a fresh salad. These sides balance the richness of the potatoes. For an extra touch, drizzle some garlic butter on top right before serving. For the full recipe, check out Parmesan Herb Hasselback Potatoes. {{image_4}} You can try different types of potatoes for this dish. Sweet potatoes add a nice twist. Their natural sweetness pairs well with the savory cheese. Yukon Gold potatoes are another great choice. They offer a creamy texture and buttery flavor that works wonderfully. Switching up your seasonings can change the whole dish. Using fresh herbs gives a bright taste. Try fresh thyme or rosemary for a fragrant boost. Dried herbs also work well, but fresh makes a difference. You can also change the cheese. Try Gruyère for a nutty flavor. Feta adds a tangy kick that is hard to resist. Toppings can take your Hasselback potatoes to the next level. Sprinkle some crispy bacon bits on top for a salty crunch. Fresh chives will add a pop of color and onion flavor. You can also drizzle sour cream or Greek yogurt on top. This adds creaminess and tang to each bite. To store leftover Parmesan Herb Hasselback Potatoes, follow these steps: - Refrigeration guidelines: Place the cooled potatoes in an airtight container. They will stay fresh for about 3 to 4 days in the fridge. Make sure the lid seals tightly to keep moisture out. - Freezing options for leftovers: You can freeze these potatoes. Wrap each potato in plastic wrap, then place them in a freezer bag. They can last up to 2 months in the freezer. When ready to eat, let them thaw in the fridge overnight. To enjoy your potatoes again, reheating properly is key. - Best reheating methods for crispy texture: The oven is your best friend for reheating. Preheat it to 350°F (175°C). Place the potatoes on a baking sheet and heat for about 15 to 20 minutes. This helps restore their crispy edges. - Microwave versus oven: While you can use the microwave, it won’t keep the potato crispy. If you’re in a hurry, microwave on medium for about 1 to 2 minutes. Just know, the texture won't be as great as the oven method. For the full recipe, check out the details above. Hasselback potatoes are thinly sliced potatoes that bake up crispy and tender. The name comes from a Swedish restaurant called Hasselbacken. They have a unique look with slices that fan out. This style allows for great flavor and texture. Typically, you should bake Hasselback potatoes for 45 to 50 minutes at 425°F (220°C). They are done when the outside is golden brown. The insides should feel soft when pierced with a fork. Yes, you can prep these potatoes ahead. Slice and season them, then cover and refrigerate. When ready to bake, let them sit at room temp for about 15 minutes. This helps them cook evenly. You can reheat leftovers in the oven to keep them crispy. Russet potatoes are the best choice. They have a high starch content, making them fluffy inside. Their thick skin also crisps nicely. Other potatoes may not hold the same shape or texture. Absolutely! You can mix and match herbs and spices. Try rosemary, smoked paprika, or even chili flakes for heat. Different cheeses like cheddar or feta can also add a twist. In this blog post, we've explored making delicious Parmesan Herb Hasselback potatoes. We covered the key ingredients, step-by-step instructions, and useful tips for perfecting your dish. You learned about variations, storage methods, and common questions. These potatoes are tasty and can impress your friends. Don’t hesitate to experiment with different herbs or toppings. You can enjoy this dish in many ways. Happy cooking!](https://magicinthedish.com/wp-content/uploads/2025/07/4dcda2b0-6d46-4ead-a490-01b0a8740e53-768x768.webp)
. To get that perfect crust on your Parmesan crusted tilapia, start by drying the fish. Use a paper towel to pat the fillets dry. This step helps the coating stick better during cooking. If the fish is wet, the crust can become soggy. Next, ensure you coat the fish evenly. After dipping the fillets in beaten eggs, press them into the Parmesan breadcrumb mixture. Cover both sides well. This way, you get a nice, crunchy texture when it bakes. When serving, think about what goes well with the fish. Steamed vegetables or a bright salad are great choices. They add color and nutrition to your meal. For plating, arrange the fillets on a nice platter. Add lemon wedges around the fish for a pop of color. A sprinkle of fresh parsley on top makes it look even better. One mistake is overcrowding the baking sheet. If you place too many fillets too close, they won’t cook evenly. Leave some space between each piece for hot air to flow. Another mistake is not preheating the oven. Make sure your oven is at 400°F (200°C) before placing the fish inside. This helps the crust get crispy and brown. For the full recipe, check the main section above. {{image_4}} To make your Parmesan crusted tilapia even tastier, try adding extra spices. Some great options include: - Cayenne pepper for heat - Italian seasoning for a herby taste - Onion powder for a savory kick You can also switch up the cheese. Instead of Parmesan, use: - Asiago for a sharper flavor - Mozzarella for a creamier texture - Cheddar for a rich taste If you need a gluten-free option, replace panko breadcrumbs with: - Crushed rice cereal - Almond flour These alternatives still give a nice crunch. If tilapia isn't your favorite, try using: - Cod for a mild taste - Salmon for a richer flavor - Chicken breast for a different protein Want to try a different cooking method? The air fryer is an excellent choice. Here’s how: 1. Preheat your air fryer to 400°F (200°C). 2. Cook the coated tilapia for about 10-12 minutes. 3. Check for a golden crust and flaky fish. For a pan-frying option, follow these steps: 1. Heat olive oil in a skillet over medium heat. 2. Fry each fillet for about 4-5 minutes on each side. 3. Look for a crispy crust and fully cooked fish. Explore my full recipe for more details on making this dish. Store any leftover Parmesan crusted tilapia in the fridge. Place the fish in a shallow, airtight container. This keeps it fresh and tasty. It is best to eat leftovers within two days. For best results, try to keep the crust intact. To reheat, use an oven or an air fryer. Preheat the oven to 350°F (175°C) and bake for about 10 minutes. This helps keep the crust crispy. In the air fryer, set it to 350°F (175°C) for about 5 minutes. Check that the fish is warmed through. Yes, you can freeze Parmesan crusted tilapia! Wrap each fillet tightly in plastic wrap. Then, place them in a freezer bag. This keeps them safe from freezer burn. To thaw, move the fish to the fridge overnight. You can also use a microwave on low power if you're in a hurry. For the full recipe, see above. Enjoy your tasty and simple dinner idea! Yes, you can use frozen tilapia. Just thaw it before cooking. To thaw, place the fish in the fridge overnight. If you need it faster, seal it in a bag and submerge it in cold water for about an hour. Make sure the fish is fully thawed. This helps the coating stick better. Look for a few signs to know if the fish is done. First, it should turn golden brown on the outside. Then, use a fork to check the fish. If it flakes easily, it’s ready. The flesh should be opaque, not translucent. An internal temperature of 145°F (63°C) means it’s safe to eat. Yes, this dish can be prepped ahead of time. You can coat the tilapia and keep it in the fridge for up to one day. Just cover it with plastic wrap. When you are ready, bake it as directed. If you want, you can also freeze the coated fillets. Thaw them overnight in the fridge before baking. This dish pairs well with many sides. Here are some great options: - Roasted vegetables: Carrots, asparagus, or broccoli. - Salads: A light green salad with lemon vinaigrette. - Rice or quinoa: Simple and filling options. - Potatoes: Mashed, baked, or roasted. - Drinks: A crisp white wine or sparkling water complements the fish. This blog post showed you how to make Parmesan crusted tilapia, focusing on ingredients, preparation, and tips. With simple steps, you can create a tasty dish that's crispy and satisfying. Remember to dry the fish well for the best crust. Whether you are cooking for family or friends, this recipe offers great flavors. Enjoy experimenting with variations and serving ideas. With practice, you’ll master this dish and impress everyone at the table. Cooking can be fun, so dive in and try it today!](https://magicinthedish.com/wp-content/uploads/2025/07/64276ab1-6b2f-4d14-8b32-0baa2a2d38a8-768x768.webp)
![- 8 oz. pasta (penne or rotini recommended) - 1 lb ground beef or turkey - 1 packet taco seasoning - 1 can (15 oz) black beans, rinsed and drained - 1 can (15 oz) diced tomatoes with green chilies - 1 cup corn (fresh or frozen) - 2 cups chicken or vegetable broth - 1 cup shredded cheddar cheese - 1 tablespoon olive oil - 1/2 cup chopped green onions - 1/4 cup chopped fresh cilantro - Salt and pepper to taste - Optional toppings: avocado slices and sour cream When I make Taco Pasta Skillet, I love how simple it is. You only need a few main ingredients to create a rich and tasty meal. The pasta serves as the base, soaking up all those yummy flavors. Ground beef or turkey gives it protein, while the taco seasoning adds that awesome spice. I always keep canned goods like black beans and diced tomatoes on hand. They bring extra texture and flavor to the dish. Corn adds sweetness, making the meal even better. Don’t forget the broth! It helps cook the pasta and keeps everything moist. Shredded cheddar cheese is the cherry on top, melting beautifully over the skillet. Green onions and cilantro add a fresh touch, and you can finish it off with avocado and sour cream if you like. For a full recipe, check out the detailed steps to make this tasty dish! - Warm the olive oil in a large skillet over medium heat. - Brown the ground beef or turkey, breaking it apart with a spatula. - Stir in the taco seasoning and cook briefly until fragrant. - Add uncooked pasta, broth, diced tomatoes, black beans, and corn to the skillet. - Bring the mixture to a boil, then cover and simmer until the pasta is al dente. - Remove from heat, top with cheese, and let it melt for a few minutes. This simple process creates a one-pan meal that is fast and full of flavor. For a full recipe, check [Full Recipe]. - Ensure the meat is well browned for maximum flavor. This step builds a rich taste. - Adjust broth quantity for desired consistency. Less broth makes it thicker, more broth keeps it saucy. - Add extra spices like cumin or chili powder for more kick. These spices add depth and warmth. - Mix in additional vegetables for added nutrition. Bell peppers, zucchini, or spinach fit well here. - Serve hot with lime wedges for an extra zesty flavor. The lime brightens every bite. - Pair with a side salad for a complete meal. A simple green salad works great to balance the dish. For the full recipe, check the section earlier in the article. {{image_4}} You can swap ground beef for ground turkey for a healthier option. Turkey has less fat but still adds great flavor. If you're gluten-free, try using gluten-free pasta. It works just as well and keeps the dish tasty. For a vegan version, replace the meat with lentils or mushrooms. Both options soak up the spices well. If you want to make it dairy-free, use a dairy-free cheese alternative. This way, everyone can enjoy this meal. To give your dish a Mexican twist, add jalapeños or chipotle for extra heat. If you prefer an Italian flavor, mix in Italian seasoning and fresh basil. These small changes can make a big difference in taste. Store leftovers in an airtight container in the refrigerator. I find this meal tastes best within 3-4 days. Keeping it sealed helps maintain the flavor and texture. You can freeze Taco Pasta Skillet for up to 3 months. Just be sure to use a freezer-safe container. When you're ready to enjoy it again, simply reheat in the microwave or a skillet. When reheating, add a splash of broth to restore the creaminess. This simple trick works wonders! For an extra burst of flavor, top with fresh cheese before reheating. Enjoy your meal just like the first time! Total time is approximately 30 minutes including prep and cooking. This makes it a quick and easy meal option. Yes, it can be prepared in advance and stored in the refrigerator. Just reheat it when you are ready to eat. Enjoy it with a simple side salad or tortilla chips. These add a nice crunch to your meal. Substitute with gluten-free pasta to make it gluten-free. This way, everyone can enjoy this tasty dish. Yes, ground chicken or pork can be used as alternatives. This allows you to customize the dish to your taste preferences. For the full recipe and more details, check out the [Full Recipe]. This taco pasta skillet combines simple ingredients with easy steps for a delicious meal. You learned how to prepare, cook, and store this dish while exploring fun variations and tips to boost flavor. Use these insights to make this recipe uniquely yours. Remember, cooking is about trying new things and enjoying the process. So gather your ingredients and get started today!](https://magicinthedish.com/wp-content/uploads/2025/07/4ffa23cc-e3d5-45eb-be7c-85c8e19ba776-768x768.webp)
