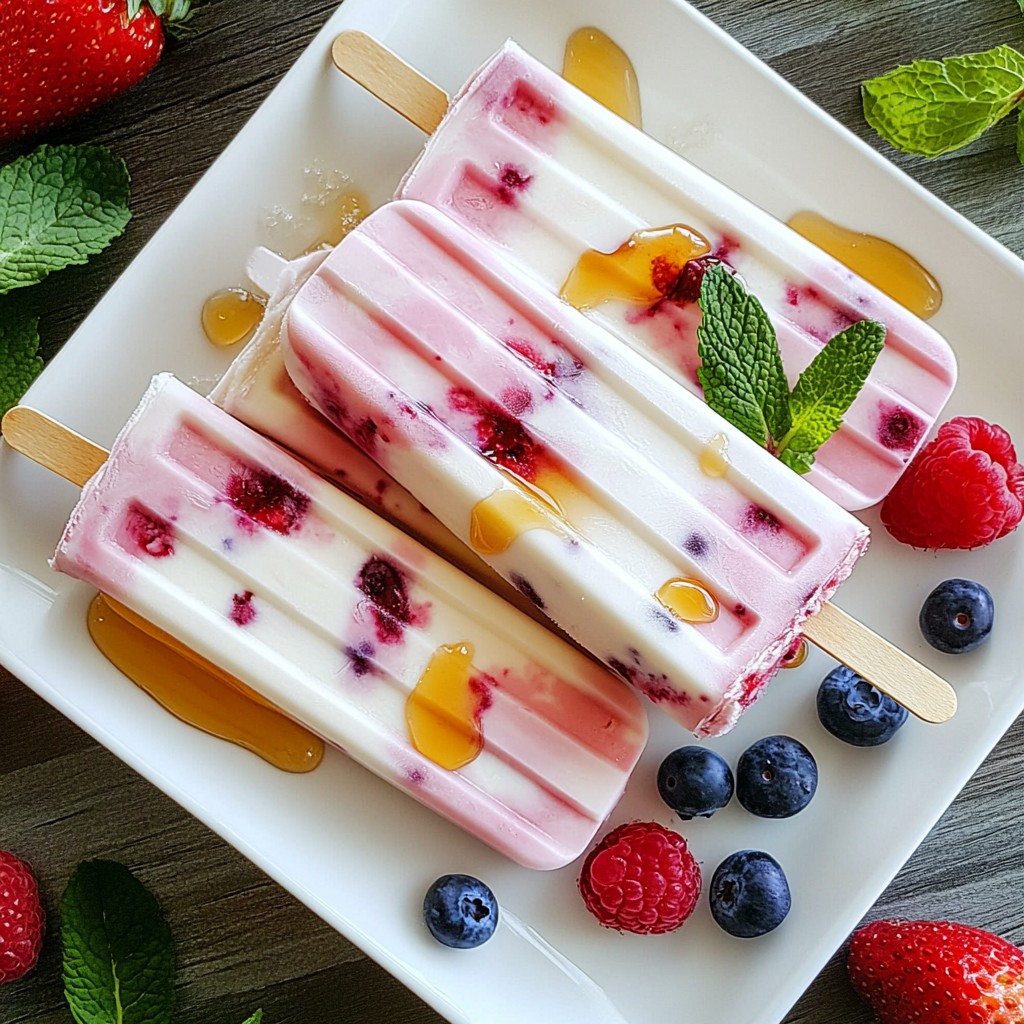
Are you ready to beat the heat with a yummy treat? These Berry Yogurt Popsicles are simple to make and packed with flavor! With just a few ingredients like fresh berries and creamy Greek yogurt, you can whip up a cool snack that everyone will love. Perfect for kids and adults, these pops are a fun way to enjoy a healthy dessert. Let’s dive into how to make this refreshing delight!
Why I Love This Recipe
- Delicious Flavor Combination: The mix of strawberries, blueberries, and raspberries creates a burst of fruity goodness in every bite.
- Healthy Ingredients: With Greek yogurt and natural sweeteners, these popsicles are a wholesome treat that you can feel good about.
- Easy to Make: With just a few simple steps, you can whip up a batch of these refreshing popsicles in no time.
- Perfect for Summer: These yogurt popsicles are a fantastic way to cool down on a hot day while enjoying a tasty snack.
Ingredients
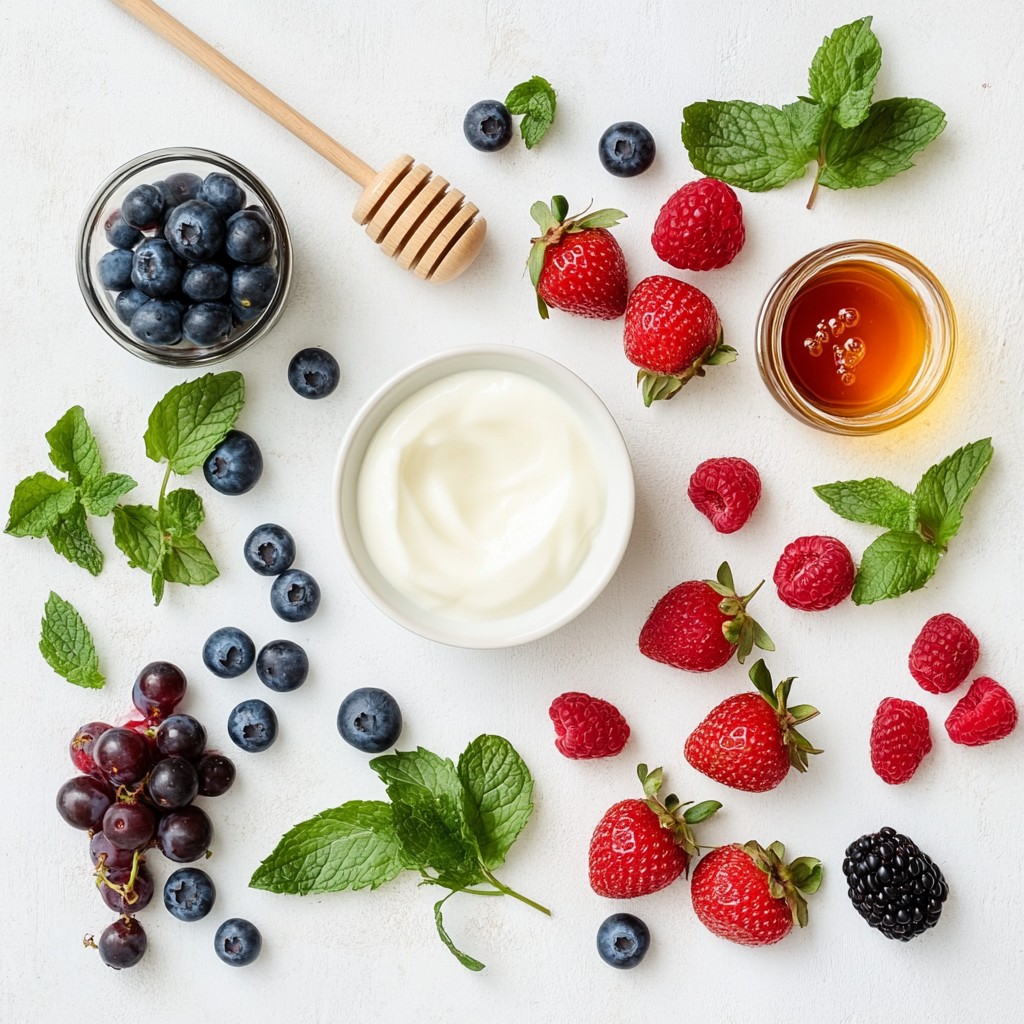
List of Ingredients
- 2 cups mixed berries (strawberries, blueberries, raspberries)
- 1 cup Greek yogurt (plain or vanilla)
- 1/4 cup honey or maple syrup
- 1 teaspoon vanilla extract
- 1/2 cup coconut water or fruit juice (optional)
- Fresh mint leaves (optional for garnish)
For these berry yogurt popsicles, you need fresh and tasty ingredients. The berries bring natural sweetness and color. I love using strawberries, blueberries, and raspberries together. They blend well, and each adds its unique flavor. Greek yogurt gives a creamy texture and a protein boost. You can use plain or vanilla yogurt, depending on how sweet you want it.
Next, you need a sweetener. Honey or maple syrup works great. I prefer honey for its rich taste. The vanilla extract enhances the flavor and makes it more inviting. You can also add coconut water or fruit juice. This step is optional but adds a fruity twist.
Finally, fresh mint leaves can make a lovely garnish. They add a pop of color and a refreshing taste. Having all these ingredients ready makes the process easy and fun.
Step-by-Step Instructions
Preparation Steps
- Start by washing 2 cups of mixed berries. I love using strawberries, blueberries, and raspberries together. If you use strawberries, hull and slice them for the best blend.
- Next, add the washed berries to a high-speed blender. Include 1 cup of Greek yogurt, 1/4 cup of honey or maple syrup, and 1 teaspoon of vanilla extract. You can add 1/2 cup of coconut water or fruit juice for extra flavor.
- Blend everything until smooth and creamy. Taste it! If you want it sweeter, just add more honey or syrup.
- Carefully pour the mixture into popsicle molds. Fill each mold about three-quarters full. This allows room for the mixture to expand when it freezes.
Freezing Process
- Insert the popsicle sticks into the molds. Make sure to pack the mixture gently. This helps remove any air bubbles.
- Place the filled molds in the freezer. Let them freeze for at least 4 to 6 hours. You want them completely solid before serving.
Serving Suggestions
- To release the popsicles, run warm water over the outside of the molds. Do this for a few seconds until they come out easily.
- Gently pull the popsicles from the molds. Enjoy them right away! If you want, garnish with fresh mint leaves for a nice touch.
Tips & Tricks
Achieving the Best Texture
Using Greek yogurt is key for a creamy popsicle. It has a thick texture that helps the popsicles stay smooth. It also adds protein, making them a bit healthier. Blend all your ingredients well. This ensures a nice, even mix. I recommend blending on high speed. You want to break down the berries fully. If you feel it’s too thick, you can add a bit more coconut water or juice.
Flavoring Options
You can play with different fruits and juices. Try mango, peach, or even kiwi for fun flavors. Each fruit adds a unique twist. Use honey or maple syrup to sweeten. Adjust to your taste. If you want it less sweet, add less syrup. You can also use agave or stevia as sweetening options. Keep in mind, some fruits are sweeter than others.
Ideal Freezing Conditions
Set your freezer to the coldest setting. This helps the popsicles freeze quickly and evenly. A temperature of 0°F (-18°C) is ideal. To prevent ice crystals, make sure to seal your popsicle molds tightly. If you notice ice forming, it could mean your popsicles were not frozen fast enough. You can also try covering the molds with plastic wrap before freezing. This extra layer helps keep air out.
Pro Tips
- Fresh Ingredients: Use the freshest berries you can find for the best flavor and nutrition. Seasonal berries often taste the sweetest!
- Sweetness Adjustments: Remember that the sweetness of the popsicles can vary based on the ripeness of your fruits. Always taste the mixture before freezing!
- Layering Flavors: Feel free to mix and match different flavors of yogurt or add a splash of lemon juice for a zesty twist!
- Storage Tips: Store any leftover popsicles in an airtight container in the freezer to prevent them from absorbing any unwanted odors.
Variations
Berry Combinations
You can mix and match berries for fun flavors. Use only strawberries for a sweet treat. Blueberries add a nice tartness. Raspberries give a lovely color and tang. For a tropical twist, add mango or pineapple. These fruits blend well with the yogurt. They also add a refreshing taste.
Dairy Alternatives
If you want to make this dairy-free, try vegan yogurt. Almond or coconut yogurt works great. Use agave or stevia as sweeteners. They are good options if you want to cut sugar. Just remember to adjust the amount for taste.
Additional Mix-ins
For extra crunch, add nuts or granola. They give your popsicles a nice texture. You can also swirl in fruit puree. This adds more fruit flavor and looks pretty. Just drop some puree in before freezing. This way, you get a beautiful marbled effect.
Storage Info
How to Store Popsicles
To keep your berry yogurt popsicles fresh, freeze them correctly. Place the popsicles in airtight bags or containers. This method prevents freezer burn. Label the bags with dates for easy tracking. You can keep them in the freezer for about 4 to 6 weeks. They will taste best within this time.
Thawing and Re-Freezing Guidelines
When you want to enjoy a popsicle, take one out of the freezer. The best way to thaw them is at room temperature for a few minutes. You can also run warm water over the outside of the mold. This helps to loosen the popsicle. If thawed popsicles are not eaten, you can refreeze them. However, repeated thawing and refreezing can affect their texture.
Packaging Ideas
If you make a big batch, storing popsicles in bulk saves space. Use silicone molds or small freezer-safe containers. You can also wrap individual popsicles in plastic wrap. For eco-friendly options, consider using reusable silicone bags. These are great for the planet and keep your popsicles fresh.
FAQs
Common Questions About Berry Yogurt Popsicles
How long do frozen popsicles last? Frozen popsicles can last up to two months in the freezer. After that, they may lose flavor and texture.
Can I use frozen berries instead of fresh? Yes, you can use frozen berries! They work well and can make your popsicles extra cold and refreshing. Just blend them straight from the freezer.
Customization Questions
Can I substitute yogurt types? Absolutely! You can use any yogurt you like. Greek yogurt gives a rich taste, but regular yogurt works too.
What if I don't have popsicle molds? If you don’t have molds, you can use small cups or ice trays. Just insert sticks or spoons into the mix before freezing.
Health and Nutritional Questions
Are these popsicles healthy? Yes, these popsicles are healthy! They have natural sugars from fruit and yogurt, plus vitamins and minerals.
Caloric information and serving sizes Each popsicle has about 100 calories, depending on the sweetener used. This recipe makes six popsicles, perfect for sharing.
This blog post shared how to make tasty berry yogurt popsicles. You learned about the ingredients, simple steps, and cooling times. I covered tips for texture and flavor, plus fun variations. With this guide, you can mix your favorite fruits or change up the yogurt.
These popsicles are not just fun; they’re healthy too. Enjoy them as a cool treat. Try different ingredients to find your favorite flavor. Your homemade popsicles will impress and brighten your day.