Are you ready for a dip that’s bold and packed with flavor? Buffalo Chickpea Dip is here to spice up your snack game! This creamy, savory treat combines chickpeas, creamy ingredients, and spicy buffalo sauce for a snack that’s hard to resist. Whether you’re hosting a party or just craving something delicious, I’ll guide you through each step to make this tasty dip. Let’s dive in!
Why I Love This Recipe
- Flavor Explosion: This dip combines the earthy taste of chickpeas with the spicy kick of buffalo sauce, creating a delightful flavor explosion in every bite.
- Easy to Make: With just a handful of ingredients and simple steps, this dip can be whipped up in no time, making it perfect for spontaneous gatherings.
- Healthy Twist: Using chickpeas and Greek yogurt adds nutritional value, making this dip a healthier alternative to traditional creamy dips.
- Versatile Serving Options: This dip pairs wonderfully with tortilla chips or fresh veggies, allowing you to customize your snacking experience.
Ingredients
Main Ingredients
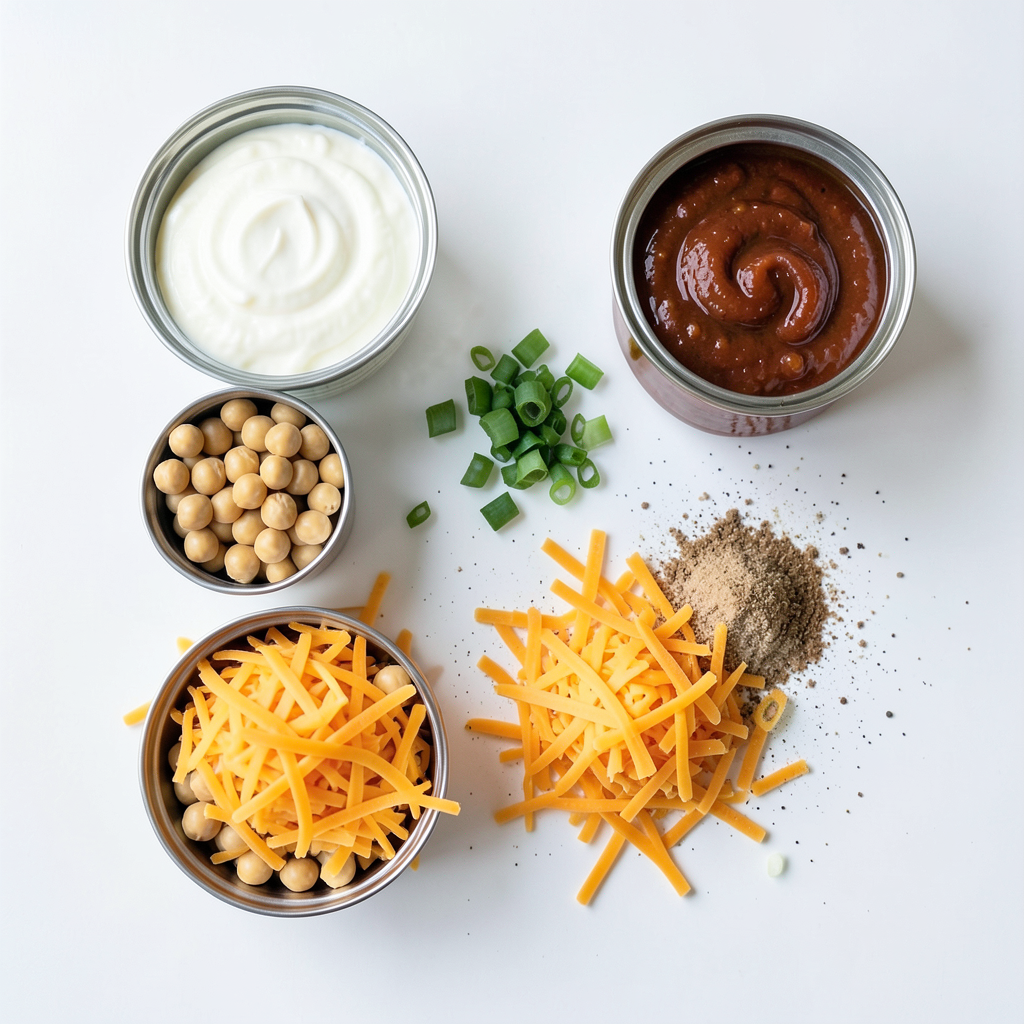
- 1 can (15 oz) chickpeas, thoroughly drained and rinsed
- 1/4 cup creamy Greek yogurt
- 1/4 cup cream cheese, softened to room temperature
- 1/4 cup tangy hot buffalo sauce
These main ingredients form the heart of the dip. Chickpeas bring protein and fiber, making the dip filling. Greek yogurt and cream cheese add creaminess and a nice tang. The buffalo sauce gives it that spicy kick.
Optional Ingredients
- Additional spices
- Cheese varieties
- Fresh garnishes
You can add extra spices to enhance flavor. Things like smoked paprika or cumin can add depth. Different cheese, like blue cheese, can give a bold taste. Fresh garnishes like chopped cilantro or parsley can brighten the dish.
Serving Suggestions
- Tortilla chips
- Crisp celery sticks
I love serving this dip with crispy tortilla chips. They add crunch and a nice texture. Crisp celery sticks offer a fresh contrast. Both options make the dip fun and easy to enjoy.
Step-by-Step Instructions
Preparation Steps
1. Mashing chickpeas: Start with a can of chickpeas. Drain and rinse them well. Use a fork or potato masher to mash the chickpeas in a medium bowl. Aim for a chunky texture. You want some pieces left whole for a nice bite.
2. Mixing in other ingredients: Once the chickpeas are ready, add in the creamy Greek yogurt and softened cream cheese. Pour in the buffalo sauce and add the sharp shredded cheddar cheese. Toss in the finely sliced green onions. Sprinkle in garlic powder, onion powder, and a pinch of salt and pepper. Mix everything well until it’s all combined.
Baking Instructions
1. Preheating the oven: Preheat your oven to 350°F (175°C). This ensures your dip bakes evenly and gets bubbly.
2. Baking time and temperature: Transfer the dip mixture to an oven-safe dish. Spread it evenly for even cooking. Bake for 15-20 minutes. Look for bubbly edges and a slightly golden top to know it's ready.
Serving Preparations
1. Cooling time: After baking, take the dip out of the oven. Let it cool for a few minutes. This makes it easier to serve.
2. Garnishing tips: For a fresh touch, sprinkle extra sliced green onions on top. Serve the dip warm with colorful tortilla chips or crisp celery sticks. This makes for a fun and tasty display.
Tips & Tricks
Flavor Enhancements
- Adjusting spice levels: If you want more heat, add more buffalo sauce. If you prefer mild, reduce the sauce. Taste as you mix to find your perfect spice level.
- Add-ins for extra flavor: Try adding a splash of lemon juice for brightness. You can also mix in some diced jalapeños for added kick or fresh herbs like cilantro for freshness.
Preparation Shortcuts
- Using canned chickpeas: Canned chickpeas save time. They are ready to use, making your prep quick and easy. Just drain and rinse before mashing.
- Alternate mashing tools: A fork works well, but you can also use a potato masher or even a food processor. A food processor gives a smoother texture if that’s what you like.
Presentation Tips
- Arranging serving platter: Use a colorful platter to make your dip stand out. Surround the dip with tortilla chips and celery sticks for a fun display.
- Serving warm vs. cold: This dip is best served warm. It brings out the flavors. If you serve it cold, it still tastes good but lacks that cozy feel.
Pro Tips
- Adjust the Heat: If you prefer a milder dip, reduce the amount of buffalo sauce or opt for a milder variety. You can also add a touch of honey to balance the heat.
- Texture Matters: For a creamier dip, mash the chickpeas more thoroughly. If you enjoy more texture, leave some chickpeas partially mashed for a chunkier consistency.
- Make Ahead: Prepare the dip a day in advance and store it in the refrigerator. Just bake it when you're ready to serve for a quick and easy appetizer.
- Garnish for Style: Enhance presentation by garnishing with additional sliced green onions or crumbled feta cheese. A sprinkle of paprika or cayenne can add a pop of color too.
Variations
Dietary Modifications
If you want to make this dip vegan, swap the cream cheese and Greek yogurt for plant-based versions. Look for cashew cream or coconut yogurt. These options keep the texture creamy without dairy. For gluten-free choices, ensure your buffalo sauce and any added seasonings are gluten-free. Most sauces are safe, but it's always smart to check labels.
Alternative Flavor Profiles
You can adjust the heat level based on your taste. If you like it mild, use less buffalo sauce or choose a mild sauce. For a spicier kick, add more sauce or include diced jalapeños. You can also try different cheese. Creamy goat cheese or crumbled feta adds a unique twist. Each cheese brings its own flavor, making the dip more exciting.
Ingredient Swaps
Chickpeas are great, but white beans also work well. They give a different texture but still taste good. You can even mix both for a fun variation. For toppings, consider diced tomatoes or avocado. They add freshness and color. You could also top the dip with more cheese or a sprinkle of spices for extra flavor.
Storage Info
Short-Term Storage
After making Buffalo Chickpea Dip, you should refrigerate it right away. Use an airtight container to keep it fresh. Glass or plastic containers with tight lids are great choices. You want to avoid air getting in, which can spoil the dip faster.
Long-Term Storage
If you want to save some for later, you can freeze the dip. Transfer it to a freezer-safe container and leave some space at the top. This helps it expand as it freezes. To use it later, thaw the dip in the fridge overnight. Reheat it in the oven at 350°F until warm. Stir it well before serving to mix in any ingredients that may have settled.
Shelf Life
In the fridge, your Buffalo Chickpea Dip will last about 3 to 4 days. Always check for signs of spoilage. If you see any mold or if it smells off, it's best to toss it. Fresh dips should look bright and smell tasty!
FAQs
How to make Buffalo Chickpea Dip?
To make Buffalo Chickpea Dip, follow these simple steps:
1. Mash the chickpeas: Start by draining and rinsing one can of chickpeas. Use a fork or potato masher to mash them until they are slightly chunky.
2. Mix the creamy ingredients: Add 1/4 cup of Greek yogurt and 1/4 cup of softened cream cheese to the mashed chickpeas.
3. Add the buffalo sauce: Pour in 1/4 cup of hot buffalo sauce. Adjust the amount based on how spicy you want it.
4. Stir in cheese and onions: Mix in 1/4 cup of shredded cheddar cheese and 2 finely sliced green onions.
5. Season the dip: Add 1 teaspoon of garlic powder, 1 teaspoon of onion powder, and salt and pepper to taste. Mix everything until well combined.
6. Bake the dip: Transfer the mix to an oven-safe dish and spread it evenly. Preheat your oven to 350°F (175°C) and bake for 15-20 minutes. The dip is done when it is hot and bubbly.
7. Cool and serve: Let it cool for a few minutes before serving.
Can I make this dip ahead of time?
Yes, you can make this dip ahead of time. Here’s how:
- Preparation: Prepare the dip as directed, but skip the baking step.
- Storage: Cover the dish tightly and store it in the fridge. It will last for about 2-3 days.
- Baking later: When you are ready to serve, simply bake it as instructed. You may need to add a few extra minutes to the baking time if it is cold.
What can I serve with Buffalo Chickpea Dip?
Buffalo Chickpea Dip pairs well with several tasty options:
- Tortilla chips: These add a nice crunch and complement the dip's flavors.
- Celery sticks: Crisp celery sticks offer a fresh and healthy bite.
- Veggie sticks: Carrots, cucumbers, and bell peppers are great choices, too.
- Pita bread: Soft pita bread can scoop up the dip easily.
Feel free to mix and match your favorites for a fun snack platter!
This blog post guided you through making a tasty Buffalo Chickpea Dip. We covered key ingredients like chickpeas and creamy components. You learned how to prepare, bake, and serve the dip effectively. I shared helpful tips to enhance flavors and presented different variations for all diets. Lastly, we explored storage solutions to keep your dip fresh. Enjoy making this dip, and remember, it’s versatile and fun to share. Always feel free to experiment with flavors and toppings to make it your own!