Craving something crispy and delicious? You’re in the right place! Buttermilk fried chicken tenders are the perfect comfort food. With a juicy center and a crunchy coat, they make the ultimate meal or snack. In this guide, I'll share my secrets on how to make these tender bites at home, from picking the right ingredients to achieving that perfect crisp. Let’s dive in and bring the flavor to your table!
Why I Love This Recipe
- Flavorful Marinade: The buttermilk combined with spices creates a rich and flavorful base that enhances the chicken's taste.
- Crispy Texture: The mix of flour and cornstarch in the coating ensures a perfectly crispy exterior that contrasts beautifully with the tender chicken inside.
- Versatile Serving Options: These chicken tenders can be enjoyed on their own or served with a variety of dipping sauces for a fun and customizable experience.
- Easy to Make: This recipe is straightforward and requires minimal ingredients, making it accessible for cooks of all skill levels.
Ingredients
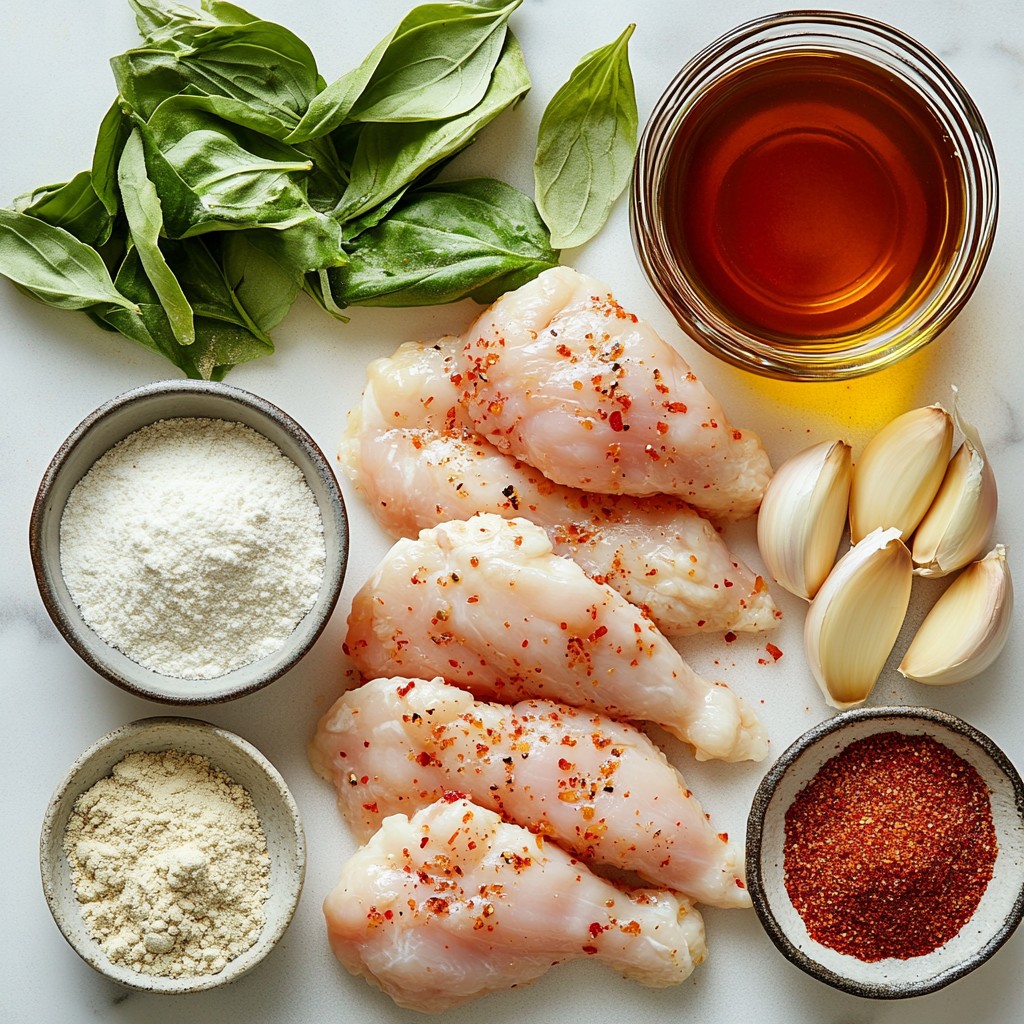
Main Ingredients for Buttermilk Fried Chicken Tenders
To make the best buttermilk fried chicken tenders, you need fresh ingredients. Here’s what you’ll need:
- 1 lb chicken tenderloins
- 1 cup buttermilk
- 1 teaspoon garlic powder
- 1 teaspoon onion powder
- 1 teaspoon smoked paprika
- 1 teaspoon salt
- ½ teaspoon black pepper
- 1 cup all-purpose flour
- ½ cup cornstarch
- Vegetable oil (for frying)
These ingredients create a flavorful and juicy chicken tender. The chicken tenderloins are the star here. They cook quickly and stay moist inside.
Spices and Seasonings to Enhance Flavor
The spices in this recipe add depth. You use garlic powder and onion powder for savory notes. Smoked paprika brings a subtle smokiness. Salt and black pepper enhance all the flavors.
Mix these spices into the buttermilk. This step ensures every bite is tasty. Marinating the chicken in this mix helps infuse it with flavor.
Best Types of Oil for Frying
Choosing the right oil is key for frying. I recommend using vegetable oil. It has a high smoke point, which is perfect for frying. Canola oil works well too.
Avoid oils with strong flavors, like olive oil. You want the chicken's flavor to shine through. Using the right oil helps achieve that lovely golden crust.
Step-by-Step Instructions
Preparing the Buttermilk Marinade
To make the buttermilk marinade, grab a big mixing bowl. Pour in 1 cup of buttermilk. Add 1 teaspoon each of garlic powder, onion powder, smoked paprika, salt, and black pepper. Whisk everything until it blends well. This mixture gives the chicken great flavor and moisture.
Marinating Chicken Tenderloins for Optimal Flavor
Now, take 1 pound of chicken tenderloins and add them to the buttermilk mix. Make sure every piece is covered. Cover the bowl with plastic wrap or a lid. Put it in the fridge for at least 1 hour or overnight if you can. Longer marinating makes the chicken taste even better.
Dredging and Frying Techniques for Crispy Coating
In a separate bowl, mix 1 cup of all-purpose flour with ½ cup of cornstarch. This mix adds a crispy coating. Heat a large skillet over medium-high heat. Add enough vegetable oil to cover the pan by 1 inch. Wait until the oil heats up to about 350°F (175°C).
Once the oil is hot, take the chicken out of the marinade. Shake off any extra liquid. Dredge each piece in the flour-cornstarch mix. Press lightly so it sticks well. Tap off extra flour before frying.
Carefully place the coated chicken in the hot oil. Fry in batches to avoid crowding. Cook for about 5-7 minutes on each side. Look for a golden brown color and an internal temperature of 165°F (74°C). When done, transfer the chicken to a plate lined with paper towels. This helps keep them crispy. Enjoy your tasty buttermilk fried chicken tenders!
Tips & Tricks
Ensuring Perfect Frying Temperature
To fry chicken well, you need the right oil temperature. Heat the oil to about 350°F (175°C). If the oil is too cold, the chicken will soak up oil and get soggy. If the oil is too hot, the coating may burn before the chicken cooks. Use a thermometer to check the heat. You can also test by dropping a bit of the flour mixture into the oil. If it sizzles and rises, the oil is ready.
How to Achieve the Crispiest Coating
For the crispiest coating, mix all-purpose flour with cornstarch. This mix gives you that crunch you crave. Make sure to coat each chicken piece well by pressing the mix onto the chicken. After dredging, gently shake off the extra mixture. Fry in small batches. Overcrowding the pan will lower the oil's heat and make your chicken less crispy.
Best Practices for Marinating Chicken
Marinating chicken in buttermilk is key for flavor and tenderness. Combine buttermilk with garlic powder, onion powder, smoked paprika, salt, and black pepper. Let the chicken sit in this mix for at least an hour. For deeper flavor, let it marinate overnight. This time allows the chicken to soak in all those tasty spices and keep it juicy when cooked.
Pro Tips
- Marinate Longer for Flavor: For the best flavor, allow the chicken tenderloins to marinate overnight. This helps the spices penetrate the meat more deeply, resulting in a more flavorful bite.
- Check Oil Temperature: Use a kitchen thermometer to ensure your oil is at the right temperature (350°F or 175°C). If the oil is too cool, the chicken will absorb excess oil and become greasy; if it's too hot, the coating may burn before the chicken cooks through.
- Don’t Overcrowd the Pan: Fry the chicken tenders in batches to maintain the temperature of the oil. Overcrowding can lower the oil temperature, resulting in soggy chicken instead of crispy perfection.
- Rest After Frying: Allow the fried chicken tenderloins to rest on a paper towel-lined plate for a few minutes before serving. This helps drain excess oil and keeps the coating crispy.
Variations
Spicy Buttermilk Fried Chicken Tenders
If you want some heat, add cayenne pepper. Start with ½ teaspoon and adjust to your taste. Mix it into the buttermilk marinade. This gives the chicken a nice spicy kick. You can also add hot sauce if you like it even spicier. Just a few dashes will do! This will make your tenders stand out at any meal.
Gluten-Free Alternatives for Coating
For a gluten-free option, swap all-purpose flour with rice flour or a gluten-free blend. Cornstarch is a great choice to keep the crispiness. Mix equal parts of rice flour and cornstarch for the coating. It will still give you that crunchy texture you love. Make sure to check all labels for hidden gluten.
Flavor Infusions Using Different Seasonings
You can change the flavor by adding different spices. Try Italian seasoning for a herbaceous twist. Or, use lemon zest for a fresh, bright taste. You can even add curry powder for a unique flavor. Mix these seasonings into the buttermilk or the flour mixture. This way, you can create your own fun twist on classic buttermilk fried chicken tenders.
Storage Info
How to Store Leftover Fried Chicken Tenders
To keep your fried chicken tenders fresh, store them in an airtight container. Place a paper towel at the bottom of the container to absorb any moisture. This helps keep the chicken crispy. You can store them in the fridge for up to three days. If you want to keep them longer, freezing is a great option.
Reheating Techniques for Maximum Crispiness
When it’s time to eat your leftovers, you want them crispy again. The best way to reheat them is in an oven. Preheat your oven to 400°F (200°C). Place the chicken tenders on a baking sheet lined with parchment paper. Heat them for about 10-15 minutes. This method helps restore their crunch. Avoid using the microwave, as it can make the chicken soggy.
Freezing and Thawing Recommendations
If you have extra tenders, freeze them for later. Place them in a single layer on a baking sheet. Freeze until solid, then move them to a freezer bag. This way, they won’t stick together. When you want to eat them, thaw them overnight in the fridge. Reheat as mentioned above for the best results. Enjoy your tasty treat later!
FAQs
Can I use boneless chicken breasts instead of tenders?
Yes, you can use boneless chicken breasts. Just cut them into strips about the same size as tenders. This will help them cook evenly and stay juicy. The taste will be similar, but tenders are usually more tender and flavorful.
What's the minimum marinating time for best results?
The best minimum marinating time is one hour. This allows the chicken to soak up the buttermilk and spices. If you have more time, let it marinate overnight. This gives the chicken even more flavor and makes it more tender.
How long can I store leftover chicken tenders?
You can store leftover chicken tenders in the fridge for up to three days. Make sure to keep them in an airtight container. If you want to keep them longer, freeze them. They can last in the freezer for up to three months. Just remember to reheat them well to keep them crispy!
In this post, we covered how to make buttermilk fried chicken tenders. We discussed key ingredients, spices, and the best oils for frying. I shared detailed steps for marinating and frying, along with tips to achieve a perfect crispy coating. You can also explore variations, storage methods, and answers to common questions.
By following these steps, you’ll create delightful chicken tenders every time. Enjoy experimenting with flavors and techniques, making this dish your own!