Cherry Chocolate Chip Ice Cream Delightful Treat Recipe

WANT TO SAVE THIS RECIPE?

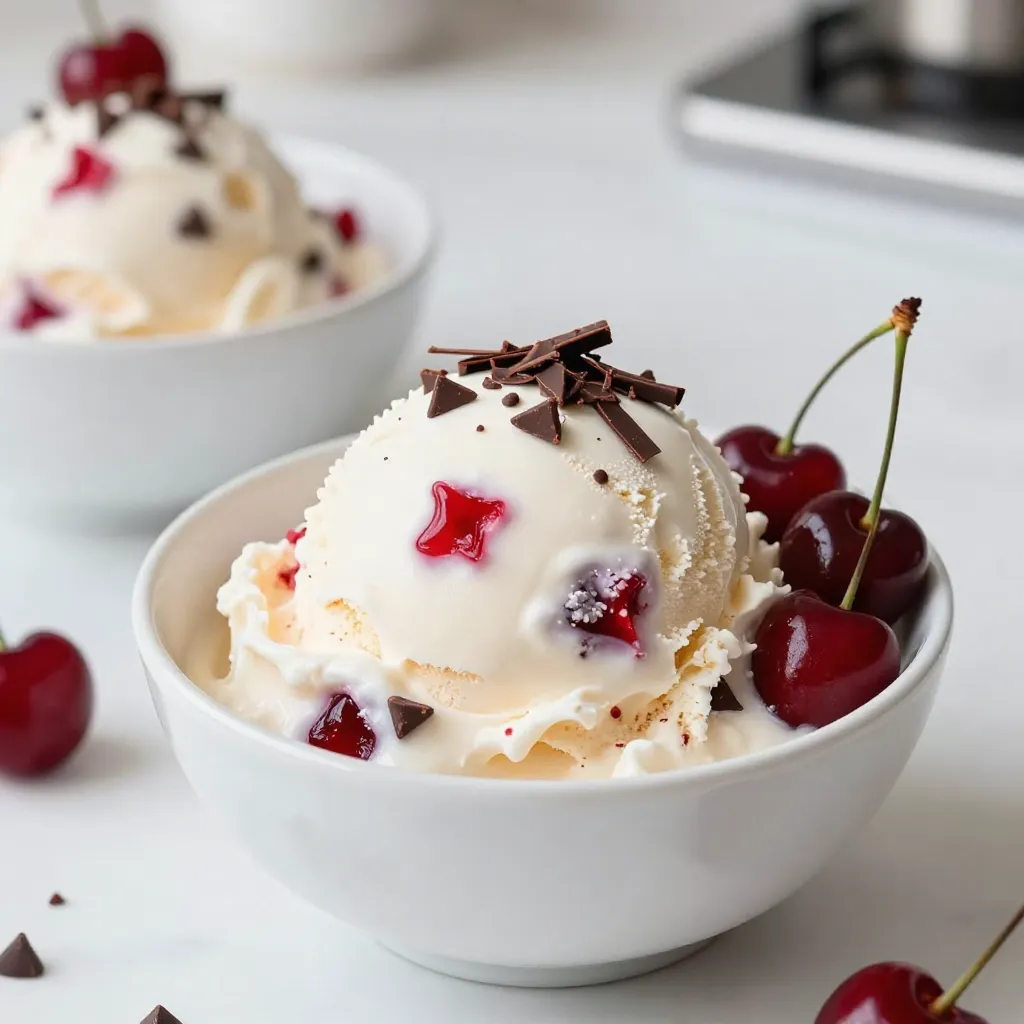
Craving a sweet and fruity treat? You’re in the right place! Here’s an easy recipe for Cherry Chocolate Chip Ice Cream that will hit the spot. With fresh cherries, rich cream, and just the right amount of chocolate, this homemade delight will become your new favorite dessert. Let’s dive into the ingredients and steps you need to create this tasty treat at home!

You will need 2 cups of fresh cherries. Start by pitting and halving them. Fresh cherries add a sweet and tart flavor to the ice cream. Their juices mix well with the cream. This makes the ice cream taste bright and fruity. You can use dark or light cherries. Both work great in this recipe. For the creamy base, you need 1 cup of heavy cream and 1 cup of whole milk. Heavy cream gives the ice cream its rich texture, while whole milk keeps it smooth. Together, they create a base that is creamy and nice. This mix is essential for the perfect ice cream experience. You will also need 3/4 cup of granulated sugar, divided into two parts. Use 1/4 cup for the cherries and 1/2 cup for the cream mix. This sugar helps balance the tartness of the cherries. Add 1 teaspoon of pure vanilla extract for a warm flavor twist. A pinch of salt enhances all the tastes. Lastly, include 1 tablespoon of fresh lemon juice. This brightens the flavor and helps the cherries shine. Don't forget 1/2 cup of mini chocolate chips for a fun crunch! {{ingredient_image_2}} Start by taking two cups of fresh cherries. Make sure to pit and halve them. In a medium bowl, mix the cherries with 1/4 cup of granulated sugar. Add one tablespoon of fresh lemon juice to this mix. Stir well. Let it sit at room temperature for about 30 minutes. This step helps the cherries release their juices. You will get a sweet cherry syrup that adds flavor to your ice cream. While the cherries are soaking, grab a large mixing bowl. Combine 1 cup of heavy cream, 1 cup of whole milk, and the remaining 1/2 cup of granulated sugar. Add one teaspoon of pure vanilla extract and a pinch of salt. Whisk these ingredients together until the sugar dissolves. This should take about 1-2 minutes. You want a smooth, creamy mixture that will be the base for your ice cream. After the cherries have soaked, use a fork to gently mash them. This creates a chunky sauce. Pour the cherry mixture into the cream base. Stir until everything is well mixed. Next, transfer this mixture into an ice cream maker. Follow the manufacturer's instructions for churning. This usually takes 20-25 minutes. In the last few minutes of churning, slowly add 1/2 cup of mini chocolate chips. This ensures even distribution throughout the ice cream. Once it reaches a soft-serve consistency, put the ice cream into an airtight container. Seal it tightly and freeze for at least 4 hours. For the best serving experience, let the ice cream sit at room temperature for 5-10 minutes before scooping. This makes it easier to serve and gives a smoother texture. Enjoy your homemade cherry chocolate chip ice cream! To get the best texture, chill your ingredients first. Use cold cream and milk. This helps the mixture churn better. After mixing the cherry and cream parts, churn the ice cream until it is soft-serve. If it feels too soft, let it freeze longer. Remember, the more you churn, the creamier it gets. For serving, let the ice cream sit out for 5-10 minutes. This makes scooping easier. Serve it in waffle cones or pretty bowls. Add whole cherries or chocolate shavings on top for flair. This makes your treat look fancy and fun. Pair it with a fresh mint leaf for a pop of color. If your ice cream is too hard, it might freeze too long. Let it sit a bit before scooping. If it’s too soft, it may need more time in the machine. You can also try adding a bit more cream next time for a richer texture. If you see ice crystals, it means it froze too fast. Ensure your freezer is at the right temperature for the best results. Pro Tips Use Fresh Cherries: Opt for ripe, fresh cherries for the best flavor in your ice cream. Frozen cherries may dilute the taste and texture. Chill Your Mixture: Refrigerate the cream mixture for at least an hour before churning. This helps achieve a creamier consistency. Freeze the Ice Cream Maker Bowl: Ensure the bowl of your ice cream maker is completely frozen for at least 24 hours before use to ensure proper churning. Experiment with Mix-ins: Feel free to add other mix-ins such as nuts or different types of chocolate for a unique twist on the flavor. {{image_4}} If you want to change the sweetness in your ice cream, try different sweeteners. For a healthier option, you can use honey or maple syrup. These sweeteners add their own flavor, which can be nice. If you prefer no sugar at all, use stevia or erythritol. Just keep in mind that these options may affect the texture a bit. Start with small amounts and adjust to your taste. You can make this cherry chocolate chip ice cream dairy-free too! Replace the heavy cream and milk with coconut milk or almond milk. Coconut milk gives a rich and creamy feel. For a lighter option, almond milk works well. Use unsweetened versions to control the sugar content. Just like with dairy ice cream, make sure to mix well for a smooth texture. Adding extra ingredients can make your ice cream unique. You can mix in chopped nuts for crunch. Walnuts or almonds pair nicely with the cherries. For a fun twist, add crushed cookies or brownie pieces. This creates a delightful texture. You can also try different fruit, like raspberries or strawberries. Just chop them small so they blend in well. Feel free to get creative! To keep your cherry chocolate chip ice cream fresh, use an airtight container. This prevents ice crystals from forming. Be sure to fill the container to the top. This limits air exposure. Label the container with the date you made it. It helps you track freshness. Homemade cherry chocolate chip ice cream stays good in the freezer for about two weeks. After that, it may lose flavor and texture. If you see ice crystals, it means it’s starting to go bad. Trust your taste buds! If it doesn’t taste right, it’s best to toss it out. If you need to refreeze the ice cream, do it as soon as possible. Let it sit at room temperature for a few minutes before scooping. This helps it soften up. After scooping, put it back in the freezer right away. But avoid refreezing multiple times. This can ruin the texture and flavor. You can make cherry chocolate chip ice cream without a machine. Start by mixing the cream, milk, sugar, and vanilla in a bowl. Then, prepare the cherry mixture as described earlier. Combine both mixtures in a big bowl. Pour it into a shallow dish. Place it in the freezer. Stir it every 30 minutes for about 3-4 hours. This will help it freeze evenly. You’ll get creamy ice cream without a machine! A typical serving of cherry chocolate chip ice cream (about 1/2 cup) has around: - Calories: 200 - Fat: 10g - Saturated Fat: 6g - Cholesterol: 40mg - Sodium: 50mg - Carbohydrates: 30g - Fiber: 1g - Sugars: 25g - Protein: 2g These values can change based on your ingredients. Always check your product labels for the most accurate info. You can buy cherry chocolate chip ice cream at most grocery stores. Look in the ice cream aisle. Many brands offer this flavor. You can also find it at local ice cream shops. If you want a special brand, check their websites. Some shops even deliver! In this post, we explored how to make cherry chocolate chip ice cream. You learned about key ingredients, like fresh cherries and cream. We went through steps for preparing, churning, and freezing. I shared tips for a smooth texture and fun serving ideas. We also discussed variations and storage tips for your ice cream. Making this treat is fun and tasty. Try it out, and enjoy each scoop!

Why I Love This Recipe

  1. Fresh and Fruity Flavor: The combination of fresh cherries and rich chocolate makes every scoop a delightful treat, perfect for summer days.
  2. Simple Ingredients: With just a handful of ingredients, this recipe is easy to whip up, allowing you to enjoy homemade ice cream without any fuss.
  3. Customizable: Feel free to experiment with different types of chocolate or even other fruits to create your unique flavor combinations.
  4. Perfect for Sharing: This recipe serves 4-6 people, making it a great dessert for gatherings, parties, or simply enjoying with family.

Ingredients

Fresh Cherries

You will need 2 cups of fresh cherries. Start by pitting and halving them. Fresh cherries add a sweet and tart flavor to the ice cream. Their juices mix well with the cream. This makes the ice cream taste bright and fruity. You can use dark or light cherries. Both work great in this recipe.

Cream and Milk

For the creamy base, you need 1 cup of heavy cream and 1 cup of whole milk. Heavy cream gives the ice cream its rich texture, while whole milk keeps it smooth. Together, they create a base that is creamy and nice. This mix is essential for the perfect ice cream experience.

Sweeteners and Flavorings

You will also need 3/4 cup of granulated sugar, divided into two parts. Use 1/4 cup for the cherries and 1/2 cup for the cream mix. This sugar helps balance the tartness of the cherries. Add 1 teaspoon of pure vanilla extract for a warm flavor twist. A pinch of salt enhances all the tastes. Lastly, include 1 tablespoon of fresh lemon juice. This brightens the flavor and helps the cherries shine. Don’t forget 1/2 cup of mini chocolate chips for a fun crunch!

Step-by-Step Instructions

Preparing the Cherry Mixture

Start by taking two cups of fresh cherries. Make sure to pit and halve them. In a medium bowl, mix the cherries with 1/4 cup of granulated sugar. Add one tablespoon of fresh lemon juice to this mix. Stir well. Let it sit at room temperature for about 30 minutes. This step helps the cherries release their juices. You will get a sweet cherry syrup that adds flavor to your ice cream.

Making the Cream Base

While the cherries are soaking, grab a large mixing bowl. Combine 1 cup of heavy cream, 1 cup of whole milk, and the remaining 1/2 cup of granulated sugar. Add one teaspoon of pure vanilla extract and a pinch of salt. Whisk these ingredients together until the sugar dissolves. This should take about 1-2 minutes. You want a smooth, creamy mixture that will be the base for your ice cream.

Churning and Freezing

After the cherries have soaked, use a fork to gently mash them. This creates a chunky sauce. Pour the cherry mixture into the cream base. Stir until everything is well mixed. Next, transfer this mixture into an ice cream maker. Follow the manufacturer’s instructions for churning. This usually takes 20-25 minutes.

In the last few minutes of churning, slowly add 1/2 cup of mini chocolate chips. This ensures even distribution throughout the ice cream. Once it reaches a soft-serve consistency, put the ice cream into an airtight container. Seal it tightly and freeze for at least 4 hours.

For the best serving experience, let the ice cream sit at room temperature for 5-10 minutes before scooping. This makes it easier to serve and gives a smoother texture. Enjoy your homemade cherry chocolate chip ice cream!

Tips & Tricks

Perfecting the Ice Cream Texture

To get the best texture, chill your ingredients first. Use cold cream and milk. This helps the mixture churn better. After mixing the cherry and cream parts, churn the ice cream until it is soft-serve. If it feels too soft, let it freeze longer. Remember, the more you churn, the creamier it gets.

Serving Suggestions

For serving, let the ice cream sit out for 5-10 minutes. This makes scooping easier. Serve it in waffle cones or pretty bowls. Add whole cherries or chocolate shavings on top for flair. This makes your treat look fancy and fun. Pair it with a fresh mint leaf for a pop of color.

Troubleshooting Common Issues

If your ice cream is too hard, it might freeze too long. Let it sit a bit before scooping. If it’s too soft, it may need more time in the machine. You can also try adding a bit more cream next time for a richer texture. If you see ice crystals, it means it froze too fast. Ensure your freezer is at the right temperature for the best results.

Pro Tips

  1. Use Fresh Cherries: Opt for ripe, fresh cherries for the best flavor in your ice cream. Frozen cherries may dilute the taste and texture.
  2. Chill Your Mixture: Refrigerate the cream mixture for at least an hour before churning. This helps achieve a creamier consistency.
  3. Freeze the Ice Cream Maker Bowl: Ensure the bowl of your ice cream maker is completely frozen for at least 24 hours before use to ensure proper churning.
  4. Experiment with Mix-ins: Feel free to add other mix-ins such as nuts or different types of chocolate for a unique twist on the flavor.

Variations

Alternative Sweeteners

If you want to change the sweetness in your ice cream, try different sweeteners. For a healthier option, you can use honey or maple syrup. These sweeteners add their own flavor, which can be nice. If you prefer no sugar at all, use stevia or erythritol. Just keep in mind that these options may affect the texture a bit. Start with small amounts and adjust to your taste.

Dairy-Free Options

You can make this cherry chocolate chip ice cream dairy-free too! Replace the heavy cream and milk with coconut milk or almond milk. Coconut milk gives a rich and creamy feel. For a lighter option, almond milk works well. Use unsweetened versions to control the sugar content. Just like with dairy ice cream, make sure to mix well for a smooth texture.

Adding Other Mix-ins

Adding extra ingredients can make your ice cream unique. You can mix in chopped nuts for crunch. Walnuts or almonds pair nicely with the cherries. For a fun twist, add crushed cookies or brownie pieces. This creates a delightful texture. You can also try different fruit, like raspberries or strawberries. Just chop them small so they blend in well. Feel free to get creative!

Storage Info

Best Practices for Freezing

To keep your cherry chocolate chip ice cream fresh, use an airtight container. This prevents ice crystals from forming. Be sure to fill the container to the top. This limits air exposure. Label the container with the date you made it. It helps you track freshness.

Shelf Life of Homemade Ice Cream

Homemade cherry chocolate chip ice cream stays good in the freezer for about two weeks. After that, it may lose flavor and texture. If you see ice crystals, it means it’s starting to go bad. Trust your taste buds! If it doesn’t taste right, it’s best to toss it out.

Re-freezing Guidelines

If you need to refreeze the ice cream, do it as soon as possible. Let it sit at room temperature for a few minutes before scooping. This helps it soften up. After scooping, put it back in the freezer right away. But avoid refreezing multiple times. This can ruin the texture and flavor.

FAQs

How do I make cherry chocolate chip ice cream without an ice cream maker?

You can make cherry chocolate chip ice cream without a machine. Start by mixing the cream, milk, sugar, and vanilla in a bowl. Then, prepare the cherry mixture as described earlier. Combine both mixtures in a big bowl. Pour it into a shallow dish. Place it in the freezer. Stir it every 30 minutes for about 3-4 hours. This will help it freeze evenly. You’ll get creamy ice cream without a machine!

What are the nutritional facts for cherry chocolate chip ice cream?

A typical serving of cherry chocolate chip ice cream (about 1/2 cup) has around:

Calories: 200

Fat: 10g

Saturated Fat: 6g

Cholesterol: 40mg

Sodium: 50mg

Carbohydrates: 30g

Fiber: 1g

Sugars: 25g

Protein: 2g

These values can change based on your ingredients. Always check your product labels for the most accurate info.

Where can I buy cherry chocolate chip ice cream?

You can buy cherry chocolate chip ice cream at most grocery stores. Look in the ice cream aisle. Many brands offer this flavor. You can also find it at local ice cream shops. If you want a special brand, check their websites. Some shops even deliver!

In this post, we explored how to make cherry chocolate chip ice cream. You learned about key ingredients, like fresh cherries and cream. We went through steps for preparing, churning, and freezing. I shared tips for a smooth texture and fun serving ideas. We also discussed variations and storage tips for your ice cream.

Making this treat is fun and tasty. Try it out, and enjoy each scoo

You will need 2 cups of fresh cherries. Start by pitting and halving them. Fresh cherries add a sweet and tart flavor to the ice cream. Their juices mix well with the cream. This makes the ice cream taste bright and fruity. You can use dark or light cherries. Both work great in this recipe. For the creamy base, you need 1 cup of heavy cream and 1 cup of whole milk. Heavy cream gives the ice cream its rich texture, while whole milk keeps it smooth. Together, they create a base that is creamy and nice. This mix is essential for the perfect ice cream experience. You will also need 3/4 cup of granulated sugar, divided into two parts. Use 1/4 cup for the cherries and 1/2 cup for the cream mix. This sugar helps balance the tartness of the cherries. Add 1 teaspoon of pure vanilla extract for a warm flavor twist. A pinch of salt enhances all the tastes. Lastly, include 1 tablespoon of fresh lemon juice. This brightens the flavor and helps the cherries shine. Don't forget 1/2 cup of mini chocolate chips for a fun crunch! {{ingredient_image_2}} Start by taking two cups of fresh cherries. Make sure to pit and halve them. In a medium bowl, mix the cherries with 1/4 cup of granulated sugar. Add one tablespoon of fresh lemon juice to this mix. Stir well. Let it sit at room temperature for about 30 minutes. This step helps the cherries release their juices. You will get a sweet cherry syrup that adds flavor to your ice cream. While the cherries are soaking, grab a large mixing bowl. Combine 1 cup of heavy cream, 1 cup of whole milk, and the remaining 1/2 cup of granulated sugar. Add one teaspoon of pure vanilla extract and a pinch of salt. Whisk these ingredients together until the sugar dissolves. This should take about 1-2 minutes. You want a smooth, creamy mixture that will be the base for your ice cream. After the cherries have soaked, use a fork to gently mash them. This creates a chunky sauce. Pour the cherry mixture into the cream base. Stir until everything is well mixed. Next, transfer this mixture into an ice cream maker. Follow the manufacturer's instructions for churning. This usually takes 20-25 minutes. In the last few minutes of churning, slowly add 1/2 cup of mini chocolate chips. This ensures even distribution throughout the ice cream. Once it reaches a soft-serve consistency, put the ice cream into an airtight container. Seal it tightly and freeze for at least 4 hours. For the best serving experience, let the ice cream sit at room temperature for 5-10 minutes before scooping. This makes it easier to serve and gives a smoother texture. Enjoy your homemade cherry chocolate chip ice cream! To get the best texture, chill your ingredients first. Use cold cream and milk. This helps the mixture churn better. After mixing the cherry and cream parts, churn the ice cream until it is soft-serve. If it feels too soft, let it freeze longer. Remember, the more you churn, the creamier it gets. For serving, let the ice cream sit out for 5-10 minutes. This makes scooping easier. Serve it in waffle cones or pretty bowls. Add whole cherries or chocolate shavings on top for flair. This makes your treat look fancy and fun. Pair it with a fresh mint leaf for a pop of color. If your ice cream is too hard, it might freeze too long. Let it sit a bit before scooping. If it’s too soft, it may need more time in the machine. You can also try adding a bit more cream next time for a richer texture. If you see ice crystals, it means it froze too fast. Ensure your freezer is at the right temperature for the best results. Pro Tips Use Fresh Cherries: Opt for ripe, fresh cherries for the best flavor in your ice cream. Frozen cherries may dilute the taste and texture. Chill Your Mixture: Refrigerate the cream mixture for at least an hour before churning. This helps achieve a creamier consistency. Freeze the Ice Cream Maker Bowl: Ensure the bowl of your ice cream maker is completely frozen for at least 24 hours before use to ensure proper churning. Experiment with Mix-ins: Feel free to add other mix-ins such as nuts or different types of chocolate for a unique twist on the flavor. {{image_4}} If you want to change the sweetness in your ice cream, try different sweeteners. For a healthier option, you can use honey or maple syrup. These sweeteners add their own flavor, which can be nice. If you prefer no sugar at all, use stevia or erythritol. Just keep in mind that these options may affect the texture a bit. Start with small amounts and adjust to your taste. You can make this cherry chocolate chip ice cream dairy-free too! Replace the heavy cream and milk with coconut milk or almond milk. Coconut milk gives a rich and creamy feel. For a lighter option, almond milk works well. Use unsweetened versions to control the sugar content. Just like with dairy ice cream, make sure to mix well for a smooth texture. Adding extra ingredients can make your ice cream unique. You can mix in chopped nuts for crunch. Walnuts or almonds pair nicely with the cherries. For a fun twist, add crushed cookies or brownie pieces. This creates a delightful texture. You can also try different fruit, like raspberries or strawberries. Just chop them small so they blend in well. Feel free to get creative! To keep your cherry chocolate chip ice cream fresh, use an airtight container. This prevents ice crystals from forming. Be sure to fill the container to the top. This limits air exposure. Label the container with the date you made it. It helps you track freshness. Homemade cherry chocolate chip ice cream stays good in the freezer for about two weeks. After that, it may lose flavor and texture. If you see ice crystals, it means it’s starting to go bad. Trust your taste buds! If it doesn’t taste right, it’s best to toss it out. If you need to refreeze the ice cream, do it as soon as possible. Let it sit at room temperature for a few minutes before scooping. This helps it soften up. After scooping, put it back in the freezer right away. But avoid refreezing multiple times. This can ruin the texture and flavor. You can make cherry chocolate chip ice cream without a machine. Start by mixing the cream, milk, sugar, and vanilla in a bowl. Then, prepare the cherry mixture as described earlier. Combine both mixtures in a big bowl. Pour it into a shallow dish. Place it in the freezer. Stir it every 30 minutes for about 3-4 hours. This will help it freeze evenly. You’ll get creamy ice cream without a machine! A typical serving of cherry chocolate chip ice cream (about 1/2 cup) has around: - Calories: 200 - Fat: 10g - Saturated Fat: 6g - Cholesterol: 40mg - Sodium: 50mg - Carbohydrates: 30g - Fiber: 1g - Sugars: 25g - Protein: 2g These values can change based on your ingredients. Always check your product labels for the most accurate info. You can buy cherry chocolate chip ice cream at most grocery stores. Look in the ice cream aisle. Many brands offer this flavor. You can also find it at local ice cream shops. If you want a special brand, check their websites. Some shops even deliver! In this post, we explored how to make cherry chocolate chip ice cream. You learned about key ingredients, like fresh cherries and cream. We went through steps for preparing, churning, and freezing. I shared tips for a smooth texture and fun serving ideas. We also discussed variations and storage tips for your ice cream. Making this treat is fun and tasty. Try it out, and enjoy each scoop!

Cherry Chocolate Chip Ice Cream

A delicious homemade ice cream featuring fresh cherries and chocolate chips.
Prep Time 10 minutes
Cook Time 25 minutes
Total Time 5 hours
Course Dessert
Cuisine American
Servings 4
Calories 250 kcal

Ingredients
  

  • 2 cups fresh cherries, pitted and halved
  • 1 cup heavy cream
  • 1 cup whole milk
  • 3.75 cups granulated sugar, divided
  • 1 teaspoon pure vanilla extract
  • 0.5 cup mini chocolate chips
  • 1 tablespoon fresh lemon juice
  • 1 pinch salt

Instructions
 

  • In a medium bowl, combine the pitted and halved cherries with 1/4 cup of the granulated sugar and the fresh lemon juice. Stir the mixture well and let it sit at room temperature for approximately 30 minutes.
  • Meanwhile, in a large mixing bowl, whisk together the heavy cream, whole milk, the remaining 1/2 cup of granulated sugar, pure vanilla extract, and a pinch of salt until the sugar is completely dissolved.
  • Once the cherries have macerated, use a fork to gently mash them, then pour this cherry mixture into the cream mixture and stir until thoroughly combined.
  • Transfer the combined mixture into an ice cream maker and churn according to the manufacturer's instructions, typically around 20-25 minutes.
  • During the last few minutes of churning, gradually add in the mini chocolate chips.
  • When the ice cream has achieved the desired consistency, transfer it to an airtight container, seal tightly, and place it in the freezer for at least 4 hours.
  • For optimal serving, allow the ice cream to sit at room temperature for about 5-10 minutes before scooping.

Notes

For optimal serving, allow the ice cream to sit at room temperature for about 5-10 minutes before scooping.
Keyword cherry, chocolate chip, dessert, ice cream

WANT TO SAVE THIS RECIPE?

Secret Link