Chocolate Dipped Strawberry Fudge Tasty Dessert Delight

WANT TO SAVE THIS RECIPE?

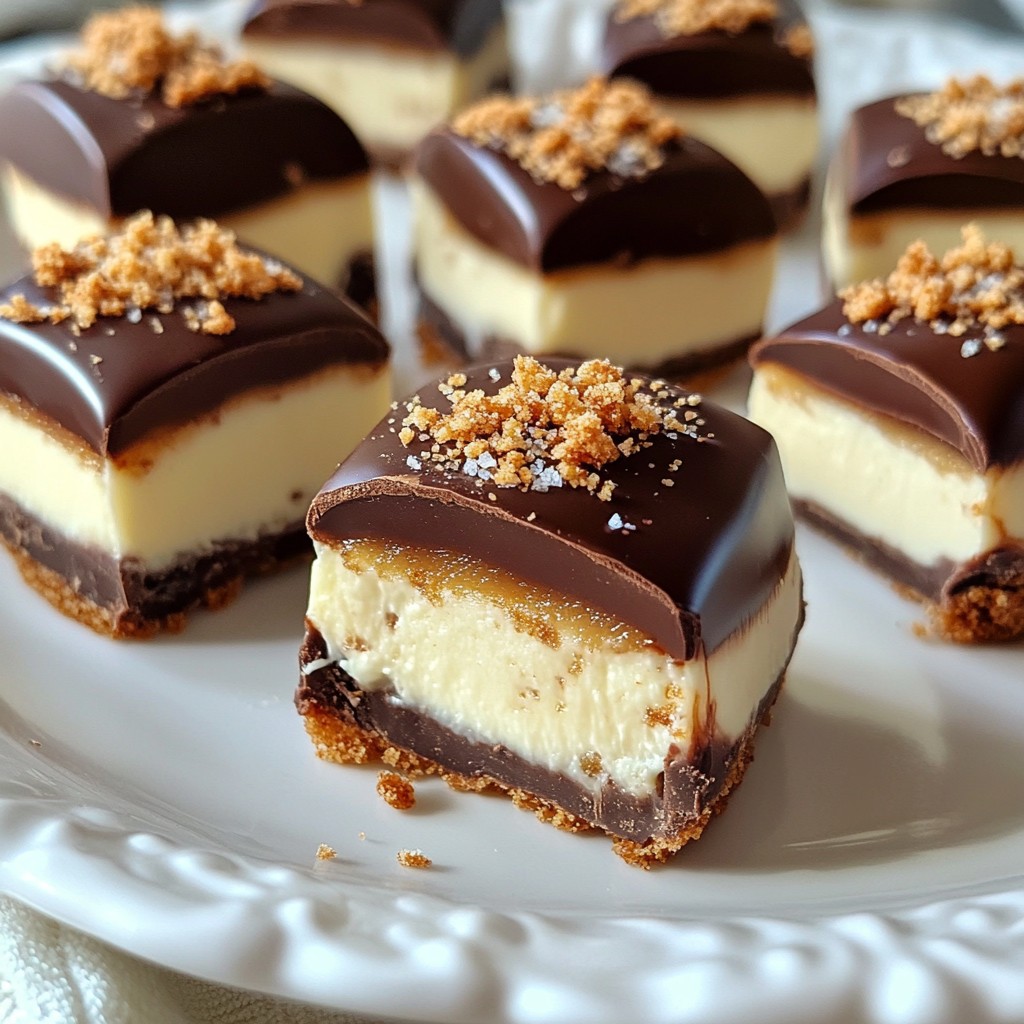
Are you ready to treat yourself to something special? Chocolate Dipped Strawberry Fudge is a sweet delight that blends rich chocolate with juicy strawberries. It’s easy to make and perfect for any occasion! In this post, I’ll guide you through simple steps, share tips to avoid common mistakes, and explore fun variations. Let’s dive into making this treat that will surely impress your friends and family!

- 1 cup fresh strawberries, hulled and thoroughly dried - 1 cup semi-sweet chocolate chips - 1 can (14 oz) sweetened condensed milk - 2 cups white chocolate chips - 1 teaspoon vanilla extract - A pinch of salt - Additional chopped strawberries (for garnish) - Parchment paper Using precise measurements is key. I always recommend using a kitchen scale for accuracy. Make sure to hull the strawberries well. They need to be dry to help the chocolate stick better. A paper towel works perfectly for this step. Try to avoid any water on them. When measuring the chocolate chips, don’t pack them tightly. Just scoop lightly and level off. If you want a richer taste, you can add a bit more chocolate. Remember, the type of chocolate can change the flavor. For the best flavor, use high-quality chocolate chips. I prefer semi-sweet and white chocolate from trusted brands. The sweetened condensed milk should be full-fat for creaminess. Fresh strawberries are a must. Look for ripe ones with bright color. This will add to the taste and look of your fudge. Using good ingredients makes a big difference. It turns a simple recipe into a dessert that everyone loves. {{ingredient_image_2}} Start with fresh strawberries. Rinse them under cool water. Remove the green tops, called hulls. Use a paper towel to dry them well. If the strawberries are wet, the chocolate won't stick. Lay them on the towel, giving them a gentle press. This step is key for great results. Grab a microwave-safe bowl. Add 1 cup of semi-sweet chocolate chips. Pour in half of the sweetened condensed milk. Heat it in the microwave for 30 seconds. Stir it, then heat again for another 30 seconds. Repeat this until the chocolate melts and is smooth. This should take about 1-2 minutes. Line an 8x8 inch baking dish with parchment paper. Let some paper hang over the sides. This helps with easy removal later. Pour half of the melted chocolate into the dish. Spread it evenly with a spatula. Place the hulled strawberries on top, pressing them gently. Next, melt the white chocolate in another bowl. Add the remaining sweetened condensed milk. Heat it like before, stirring until smooth. Pour this over the strawberries, spreading it evenly. Finally, pour the rest of the semi-sweet chocolate on top. Use your spatula to spread it out evenly. Chill the dish in the fridge for 2-3 hours. This lets the fudge set properly. Once firm, lift it out using the parchment paper. Cut it into squares, and add chopped strawberries on top for garnish. Enjoy a beautiful treat! When making chocolate dipped strawberry fudge, avoid these common mistakes: - Wet Strawberries: Always dry your strawberries well. Moisture can make chocolate slide off. - Wrong Temperatures: Don't overheat the chocolate. It can burn and become grainy. - Skipping Layers: Take time to layer correctly. Each layer adds to the taste and look. To melt chocolate smoothly, follow these tips: - Use a microwave-safe bowl. - Heat chocolate in short bursts. Start with 30 seconds, then stir. Repeat until melted. - Stir in a little oil or butter if it looks thick. This helps it stay smooth. - Always mix in vanilla and salt after melting. This enhances the flavor without clumping. To serve your fudge and wow your guests: - Cut it into neat squares. - Arrange them on a nice platter. - Garnish with chopped strawberries and mint leaves for color. - Use colorful cupcake liners for each piece. This makes each one feel special. - Pair with a scoop of vanilla ice cream for a delightful treat! Pro Tips Dry Strawberries Well: Ensure that the strawberries are completely dried after washing. Any moisture can prevent the chocolate from adhering properly. Use Quality Chocolate: For the best flavor and texture, opt for high-quality chocolate chips. This will enhance the overall taste of your fudge. Chill Thoroughly: Allow the fudge to chill for a minimum of 2-3 hours. This ensures that it sets properly and is easy to cut into squares. Garnish Creatively: Elevate the presentation by garnishing with fresh mint leaves or additional chopped strawberries for a pop of color. {{image_4}} You can make your fudge even more fun by adding nuts or other fruits. Chopped nuts like walnuts or pecans add a nice crunch. Add about half a cup and mix them in before you pour the final layer of chocolate. You can also try other fruits. Diced bananas or raspberries can give a new twist. Just remember to adjust the amount of chocolate to keep the right balance. With these additions, you create layers of flavor and texture that everyone will love. If you want a different taste, try using different kinds of chocolate. For a rich flavor, use dark chocolate instead of semi-sweet. You can also use milk chocolate for a sweeter fudge. Just remember that each type of chocolate has a different melting point. So, check the melting time in the microwave. This choice can make your fudge unique and just the way you like it. Making this fudge vegan or dairy-free is easy! Substitute the sweetened condensed milk with coconut cream or a store-bought dairy-free alternative. Use dairy-free chocolate chips for both layers. This way, you can enjoy the same great taste while keeping it plant-based. Your vegan friends will surely appreciate this delicious treat! To keep your chocolate dipped strawberry fudge fresh, store it in an airtight container. Use parchment paper between layers to prevent sticking. Make sure the fudge is fully cooled before sealing. Keep it in a cool, dry place. Avoid exposure to heat or sunlight, as this can cause melting or drying out. When stored properly, chocolate dipped strawberry fudge lasts for about one week at room temperature. If you keep it in the fridge, it can last up to two weeks. The fudge may lose some texture over time, so enjoy it fresh when you can! Freezing fudge is simple and effective. Cut your fudge into squares before freezing for easy access later. Wrap each piece in plastic wrap, then place them in a freezer bag. Be sure to remove as much air as possible. Your fudge will stay good for about three months in the freezer. When you're ready to enjoy, just thaw it in the fridge overnight. You can replace condensed milk with coconut cream or almond milk. Both options work well. Use about the same amount, one can (14 oz). This change alters the taste but keeps the fudge creamy. You may need to adjust sugar to balance sweetness. Experiment with flavors to suit your taste. Yes, you can use frozen strawberries. However, thaw them first. Make sure to dry them well before using. Wet strawberries will cause the chocolate to slide off. The taste still remains delightful, but fresh strawberries add a nice crunch. The best ways to melt chocolate are microwave and double boiler. For the microwave, use short bursts of 30 seconds. Stir after each burst until smooth. For a double boiler, simmer water in a pot. Place a heat-safe bowl over it and stir until melted. Both methods work well and ensure a smooth texture. You learned how to make chocolate dipped strawberry fudge with clear steps and tips. We covered key ingredients and their best qualities. You now know how to avoid common mistakes and impress guests with serving ideas. Consider variations, like using different fruits or chocolate types. Also, storing and freezing practices will keep your fudge fresh. Enjoy making this treat and share it with others. Your skills in the kitchen will surely shine!

Why I Love This Recipe

  1. Delicious Flavor Combination: The rich chocolate pairs perfectly with the fresh strawberries, creating a mouthwatering treat.
  2. Easy to Make: This recipe requires minimal effort, making it perfect for both beginners and seasoned bakers.
  3. Impressive Presentation: The layers of chocolate and strawberries create a visually stunning dessert that is sure to impress guests.
  4. Perfect for Any Occasion: Whether it’s a party, holiday, or just a sweet craving, this fudge is ideal for any event.

Ingredients

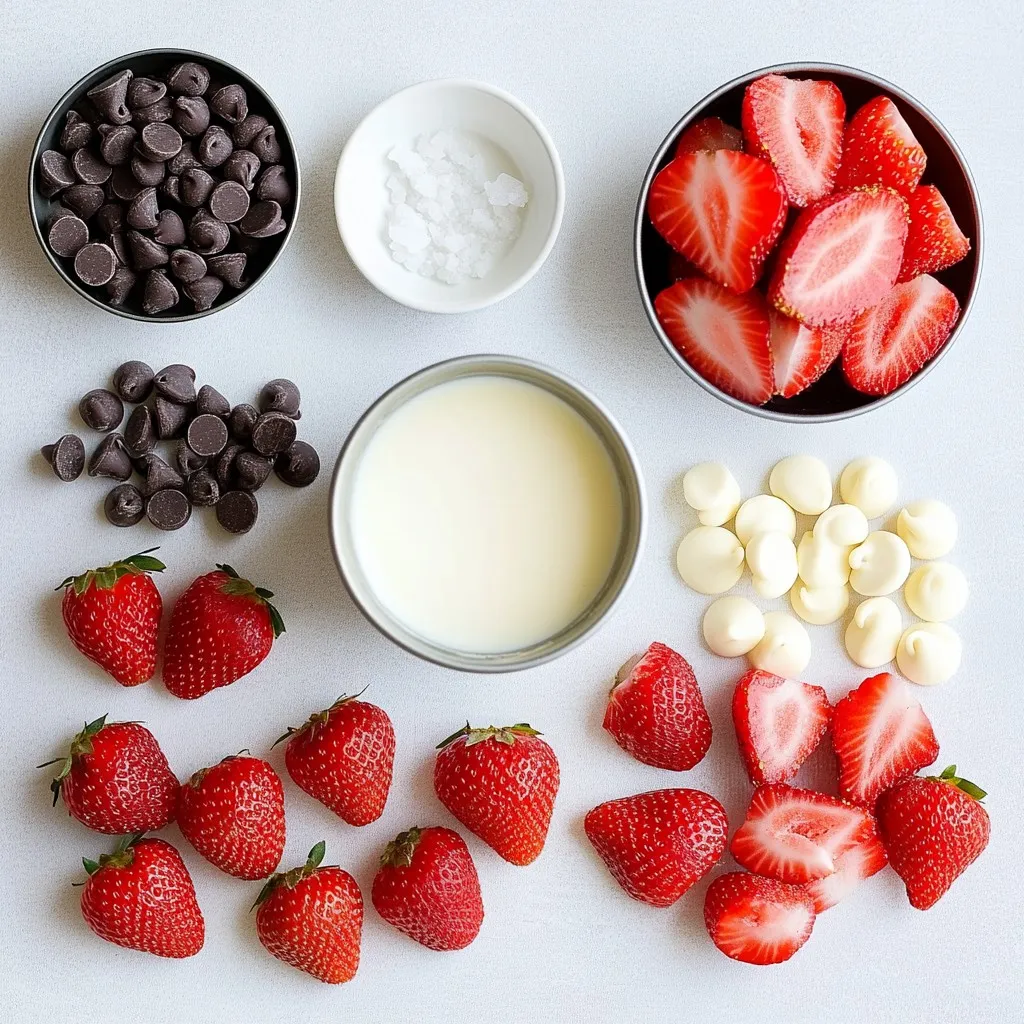
List of Ingredients for Chocolate Dipped Strawberry Fudge

– 1 cup fresh strawberries, hulled and thoroughly dried

– 1 cup semi-sweet chocolate chips

– 1 can (14 oz) sweetened condensed milk

– 2 cups white chocolate chips

– 1 teaspoon vanilla extract

– A pinch of salt

– Additional chopped strawberries (for garnish)

– Parchment paper

Measurements and Special Notes

Using precise measurements is key. I always recommend using a kitchen scale for accuracy. Make sure to hull the strawberries well. They need to be dry to help the chocolate stick better. A paper towel works perfectly for this step. Try to avoid any water on them.

When measuring the chocolate chips, don’t pack them tightly. Just scoop lightly and level off. If you want a richer taste, you can add a bit more chocolate. Remember, the type of chocolate can change the flavor.

Recommended Ingredients Quality

For the best flavor, use high-quality chocolate chips. I prefer semi-sweet and white chocolate from trusted brands. The sweetened condensed milk should be full-fat for creaminess. Fresh strawberries are a must. Look for ripe ones with bright color. This will add to the taste and look of your fudge.

Using good ingredients makes a big difference. It turns a simple recipe into a dessert that everyone loves.

Step-by-Step Instructions

Preparing the Strawberries

Start with fresh strawberries. Rinse them under cool water. Remove the green tops, called hulls. Use a paper towel to dry them well. If the strawberries are wet, the chocolate won’t stick. Lay them on the towel, giving them a gentle press. This step is key for great results.

Melting the Semi-Sweet Chocolate

Grab a microwave-safe bowl. Add 1 cup of semi-sweet chocolate chips. Pour in half of the sweetened condensed milk. Heat it in the microwave for 30 seconds. Stir it, then heat again for another 30 seconds. Repeat this until the chocolate melts and is smooth. This should take about 1-2 minutes.

Layering the Fudge

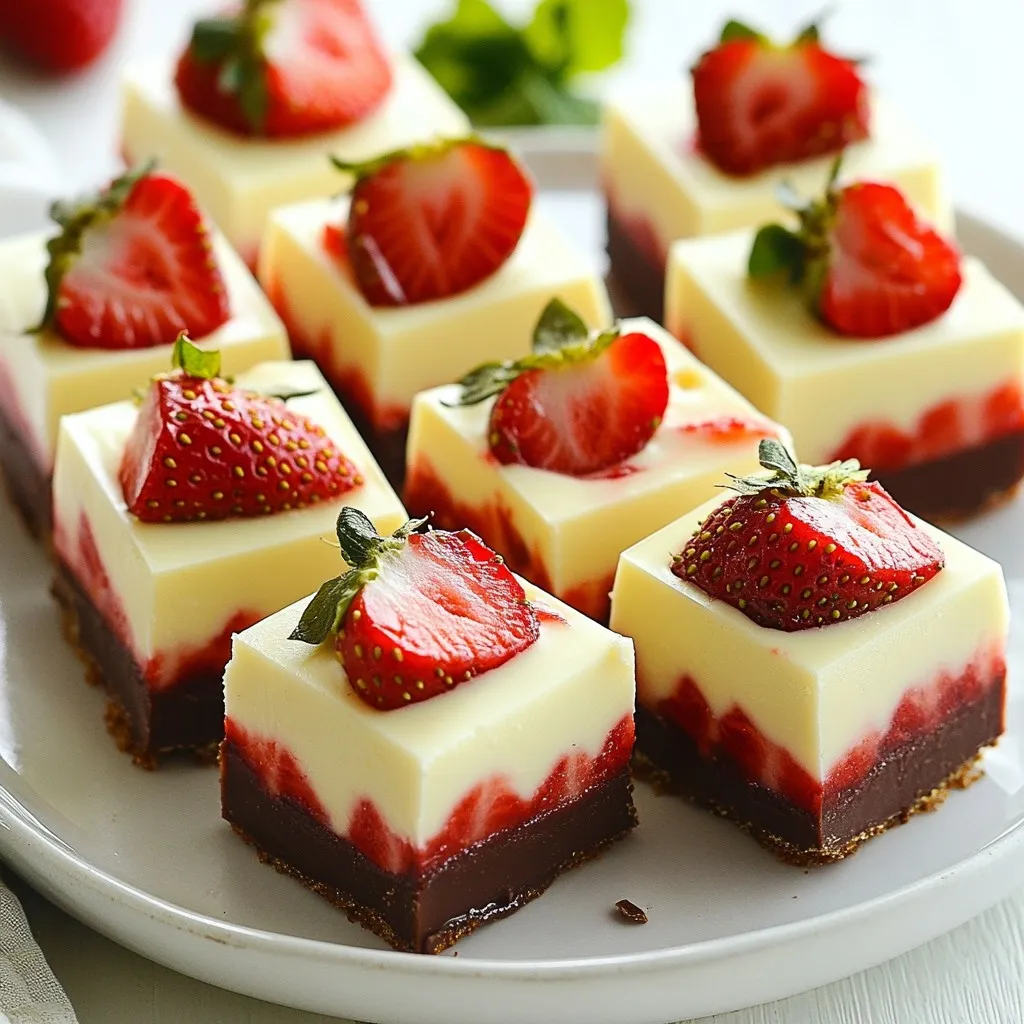
Line an 8×8 inch baking dish with parchment paper. Let some paper hang over the sides. This helps with easy removal later. Pour half of the melted chocolate into the dish. Spread it evenly with a spatula. Place the hulled strawberries on top, pressing them gently.

Next, melt the white chocolate in another bowl. Add the remaining sweetened condensed milk. Heat it like before, stirring until smooth. Pour this over the strawberries, spreading it evenly. Finally, pour the rest of the semi-sweet chocolate on top. Use your spatula to spread it out evenly.

Chill the dish in the fridge for 2-3 hours. This lets the fudge set properly. Once firm, lift it out using the parchment paper. Cut it into squares, and add chopped strawberries on top for garnish. Enjoy a beautiful treat!

Tips & Tricks

Common Mistakes to Avoid

When making chocolate dipped strawberry fudge, avoid these common mistakes:

Wet Strawberries: Always dry your strawberries well. Moisture can make chocolate slide off.

Wrong Temperatures: Don’t overheat the chocolate. It can burn and become grainy.

Skipping Layers: Take time to layer correctly. Each layer adds to the taste and look.

How to Achieve Smooth Chocolate

To melt chocolate smoothly, follow these tips:

– Use a microwave-safe bowl.

– Heat chocolate in short bursts. Start with 30 seconds, then stir. Repeat until melted.

– Stir in a little oil or butter if it looks thick. This helps it stay smooth.

– Always mix in vanilla and salt after melting. This enhances the flavor without clumping.

Serving Suggestions to Impress Your Guests

To serve your fudge and wow your guests:

– Cut it into neat squares.

– Arrange them on a nice platter.

– Garnish with chopped strawberries and mint leaves for color.

– Use colorful cupcake liners for each piece. This makes each one feel special.

– Pair with a scoop of vanilla ice cream for a delightful treat!

Pro Tips

  1. Dry Strawberries Well: Ensure that the strawberries are completely dried after washing. Any moisture can prevent the chocolate from adhering properly.
  2. Use Quality Chocolate: For the best flavor and texture, opt for high-quality chocolate chips. This will enhance the overall taste of your fudge.
  3. Chill Thoroughly: Allow the fudge to chill for a minimum of 2-3 hours. This ensures that it sets properly and is easy to cut into squares.
  4. Garnish Creatively: Elevate the presentation by garnishing with fresh mint leaves or additional chopped strawberries for a pop of color.

Variations

Adding Nuts or Other Fruits

You can make your fudge even more fun by adding nuts or other fruits. Chopped nuts like walnuts or pecans add a nice crunch. Add about half a cup and mix them in before you pour the final layer of chocolate. You can also try other fruits. Diced bananas or raspberries can give a new twist. Just remember to adjust the amount of chocolate to keep the right balance. With these additions, you create layers of flavor and texture that everyone will love.

Substituting Different Types of Chocolate

If you want a different taste, try using different kinds of chocolate. For a rich flavor, use dark chocolate instead of semi-sweet. You can also use milk chocolate for a sweeter fudge. Just remember that each type of chocolate has a different melting point. So, check the melting time in the microwave. This choice can make your fudge unique and just the way you like it.

Vegan or Dairy-Free Options

Making this fudge vegan or dairy-free is easy! Substitute the sweetened condensed milk with coconut cream or a store-bought dairy-free alternative. Use dairy-free chocolate chips for both layers. This way, you can enjoy the same great taste while keeping it plant-based. Your vegan friends will surely appreciate this delicious treat!

Storage Info

Best Practices for Storing Fudge

To keep your chocolate dipped strawberry fudge fresh, store it in an airtight container. Use parchment paper between layers to prevent sticking. Make sure the fudge is fully cooled before sealing. Keep it in a cool, dry place. Avoid exposure to heat or sunlight, as this can cause melting or drying out.

How Long Does Chocolate Dipped Strawberry Fudge Last?

When stored properly, chocolate dipped strawberry fudge lasts for about one week at room temperature. If you keep it in the fridge, it can last up to two weeks. The fudge may lose some texture over time, so enjoy it fresh when you can!

Tips for Freezing Fudge

Freezing fudge is simple and effective. Cut your fudge into squares before freezing for easy access later. Wrap each piece in plastic wrap, then place them in a freezer bag. Be sure to remove as much air as possible. Your fudge will stay good for about three months in the freezer. When you’re ready to enjoy, just thaw it in the fridge overnight.

FAQs

How can I make chocolate dipped strawberry fudge without condensed milk?

You can replace condensed milk with coconut cream or almond milk. Both options work well. Use about the same amount, one can (14 oz). This change alters the taste but keeps the fudge creamy. You may need to adjust sugar to balance sweetness. Experiment with flavors to suit your taste.

Can I use frozen strawberries for this recipe?

Yes, you can use frozen strawberries. However, thaw them first. Make sure to dry them well before using. Wet strawberries will cause the chocolate to slide off. The taste still remains delightful, but fresh strawberries add a nice crunch.

What are the best ways to melt chocolate?

The best ways to melt chocolate are microwave and double boiler. For the microwave, use short bursts of 30 seconds. Stir after each burst until smooth. For a double boiler, simmer water in a pot. Place a heat-safe bowl over it and stir until melted. Both methods work well and ensure a smooth texture.

You learned how to make chocolate dipped strawberry fudge with clear steps and tips. We covered key ingredients and their best qualities. You now know how to avoid common mistakes and impress guests with serving ideas. Consider variations, like using different fruits or chocolate types. Also, storing and freezing practices will keep your fudge fresh. Enjoy making this treat and share it with others. Your skills in the kitchen will surely shin

- 1 cup fresh strawberries, hulled and thoroughly dried - 1 cup semi-sweet chocolate chips - 1 can (14 oz) sweetened condensed milk - 2 cups white chocolate chips - 1 teaspoon vanilla extract - A pinch of salt - Additional chopped strawberries (for garnish) - Parchment paper Using precise measurements is key. I always recommend using a kitchen scale for accuracy. Make sure to hull the strawberries well. They need to be dry to help the chocolate stick better. A paper towel works perfectly for this step. Try to avoid any water on them. When measuring the chocolate chips, don’t pack them tightly. Just scoop lightly and level off. If you want a richer taste, you can add a bit more chocolate. Remember, the type of chocolate can change the flavor. For the best flavor, use high-quality chocolate chips. I prefer semi-sweet and white chocolate from trusted brands. The sweetened condensed milk should be full-fat for creaminess. Fresh strawberries are a must. Look for ripe ones with bright color. This will add to the taste and look of your fudge. Using good ingredients makes a big difference. It turns a simple recipe into a dessert that everyone loves. {{ingredient_image_2}} Start with fresh strawberries. Rinse them under cool water. Remove the green tops, called hulls. Use a paper towel to dry them well. If the strawberries are wet, the chocolate won't stick. Lay them on the towel, giving them a gentle press. This step is key for great results. Grab a microwave-safe bowl. Add 1 cup of semi-sweet chocolate chips. Pour in half of the sweetened condensed milk. Heat it in the microwave for 30 seconds. Stir it, then heat again for another 30 seconds. Repeat this until the chocolate melts and is smooth. This should take about 1-2 minutes. Line an 8x8 inch baking dish with parchment paper. Let some paper hang over the sides. This helps with easy removal later. Pour half of the melted chocolate into the dish. Spread it evenly with a spatula. Place the hulled strawberries on top, pressing them gently. Next, melt the white chocolate in another bowl. Add the remaining sweetened condensed milk. Heat it like before, stirring until smooth. Pour this over the strawberries, spreading it evenly. Finally, pour the rest of the semi-sweet chocolate on top. Use your spatula to spread it out evenly. Chill the dish in the fridge for 2-3 hours. This lets the fudge set properly. Once firm, lift it out using the parchment paper. Cut it into squares, and add chopped strawberries on top for garnish. Enjoy a beautiful treat! When making chocolate dipped strawberry fudge, avoid these common mistakes: - Wet Strawberries: Always dry your strawberries well. Moisture can make chocolate slide off. - Wrong Temperatures: Don't overheat the chocolate. It can burn and become grainy. - Skipping Layers: Take time to layer correctly. Each layer adds to the taste and look. To melt chocolate smoothly, follow these tips: - Use a microwave-safe bowl. - Heat chocolate in short bursts. Start with 30 seconds, then stir. Repeat until melted. - Stir in a little oil or butter if it looks thick. This helps it stay smooth. - Always mix in vanilla and salt after melting. This enhances the flavor without clumping. To serve your fudge and wow your guests: - Cut it into neat squares. - Arrange them on a nice platter. - Garnish with chopped strawberries and mint leaves for color. - Use colorful cupcake liners for each piece. This makes each one feel special. - Pair with a scoop of vanilla ice cream for a delightful treat! Pro Tips Dry Strawberries Well: Ensure that the strawberries are completely dried after washing. Any moisture can prevent the chocolate from adhering properly. Use Quality Chocolate: For the best flavor and texture, opt for high-quality chocolate chips. This will enhance the overall taste of your fudge. Chill Thoroughly: Allow the fudge to chill for a minimum of 2-3 hours. This ensures that it sets properly and is easy to cut into squares. Garnish Creatively: Elevate the presentation by garnishing with fresh mint leaves or additional chopped strawberries for a pop of color. {{image_4}} You can make your fudge even more fun by adding nuts or other fruits. Chopped nuts like walnuts or pecans add a nice crunch. Add about half a cup and mix them in before you pour the final layer of chocolate. You can also try other fruits. Diced bananas or raspberries can give a new twist. Just remember to adjust the amount of chocolate to keep the right balance. With these additions, you create layers of flavor and texture that everyone will love. If you want a different taste, try using different kinds of chocolate. For a rich flavor, use dark chocolate instead of semi-sweet. You can also use milk chocolate for a sweeter fudge. Just remember that each type of chocolate has a different melting point. So, check the melting time in the microwave. This choice can make your fudge unique and just the way you like it. Making this fudge vegan or dairy-free is easy! Substitute the sweetened condensed milk with coconut cream or a store-bought dairy-free alternative. Use dairy-free chocolate chips for both layers. This way, you can enjoy the same great taste while keeping it plant-based. Your vegan friends will surely appreciate this delicious treat! To keep your chocolate dipped strawberry fudge fresh, store it in an airtight container. Use parchment paper between layers to prevent sticking. Make sure the fudge is fully cooled before sealing. Keep it in a cool, dry place. Avoid exposure to heat or sunlight, as this can cause melting or drying out. When stored properly, chocolate dipped strawberry fudge lasts for about one week at room temperature. If you keep it in the fridge, it can last up to two weeks. The fudge may lose some texture over time, so enjoy it fresh when you can! Freezing fudge is simple and effective. Cut your fudge into squares before freezing for easy access later. Wrap each piece in plastic wrap, then place them in a freezer bag. Be sure to remove as much air as possible. Your fudge will stay good for about three months in the freezer. When you're ready to enjoy, just thaw it in the fridge overnight. You can replace condensed milk with coconut cream or almond milk. Both options work well. Use about the same amount, one can (14 oz). This change alters the taste but keeps the fudge creamy. You may need to adjust sugar to balance sweetness. Experiment with flavors to suit your taste. Yes, you can use frozen strawberries. However, thaw them first. Make sure to dry them well before using. Wet strawberries will cause the chocolate to slide off. The taste still remains delightful, but fresh strawberries add a nice crunch. The best ways to melt chocolate are microwave and double boiler. For the microwave, use short bursts of 30 seconds. Stir after each burst until smooth. For a double boiler, simmer water in a pot. Place a heat-safe bowl over it and stir until melted. Both methods work well and ensure a smooth texture. You learned how to make chocolate dipped strawberry fudge with clear steps and tips. We covered key ingredients and their best qualities. You now know how to avoid common mistakes and impress guests with serving ideas. Consider variations, like using different fruits or chocolate types. Also, storing and freezing practices will keep your fudge fresh. Enjoy making this treat and share it with others. Your skills in the kitchen will surely shine!

Chocolate Dipped Strawberry Fudge

A delicious fudge layered with strawberries and chocolate, perfect for dessert.
Prep Time 15 minutes
Cook Time 15 minutes
Total Time 3 hours 15 minutes
Course Dessert
Cuisine American
Servings 16
Calories 150 kcal

Ingredients
  

  • 1 cup fresh strawberries, hulled and thoroughly dried
  • 1 cup semi-sweet chocolate chips
  • 1 can (14 oz) sweetened condensed milk
  • 2 cups white chocolate chips
  • 1 teaspoon vanilla extract
  • 1 pinch salt
  • as needed additional chopped strawberries (for garnish)
  • as needed parchment paper

Instructions
 

  • Prepare the Strawberries: Start by washing the strawberries carefully, removing the hulls and drying them completely with a paper towel. A dry surface will ensure better chocolate adherence.
  • Melt the Semi-Sweet Chocolate: In a medium microwave-safe bowl, mix together the semi-sweet chocolate chips and half of the can of sweetened condensed milk. Microwave the mixture in 30-second intervals, stirring after each interval, until it is melted and has a smooth consistency. This should take about 1-2 minutes.
  • Incorporate Flavor: Once the chocolate is melted, stir in the vanilla extract and a pinch of salt. Mix until everything is well combined and smooth.
  • Layer the Base: Line an 8x8 inch square baking dish with parchment paper, leaving some overhang for easy removal later. Pour half of the prepared chocolate mixture into the dish, using a spatula to spread it evenly across the bottom.
  • Add the Strawberries: Carefully arrange the hulled strawberries on top of the first chocolate layer, pressing them down gently to anchor them in place.
  • Prepare the White Chocolate Layer: In a separate bowl, heat the white chocolate chips with the remaining sweetened condensed milk in the same method as the semi-sweet chocolate (30-second intervals), stirring until smooth.
  • Combine Layers: Carefully pour the melted white chocolate mixture over the strawberries, spreading it with a spatula to ensure each strawberry is fully covered.
  • Finish with Semi-Sweet Chocolate: Pour the remaining semi-sweet chocolate mixture over the white chocolate layer. Use the spatula to gently spread it out so it is even across the surface.
  • Chill to Set: Place the baking dish in the refrigerator and allow the fudge to chill for at least 2-3 hours, or until it is completely firm.
  • Cut and Serve: Once the fudge is set, use the parchment paper to lift it out of the baking dish. Cut it into even squares. Garnish each square with chopped strawberries on top for an appealing finish.

Notes

Arrange the fudge squares neatly on a decorative platter. Enhance the visual appeal by garnishing with fresh mint leaves or additional strawberries. For individual servings, place each square in colorful cupcake liners.
Keyword chocolate, dessert, fudge, strawberries

WANT TO SAVE THIS RECIPE?

Secret Link