Honey Garlic Chicken Thighs One Pan Savory Delight

WANT TO SAVE THIS RECIPE?

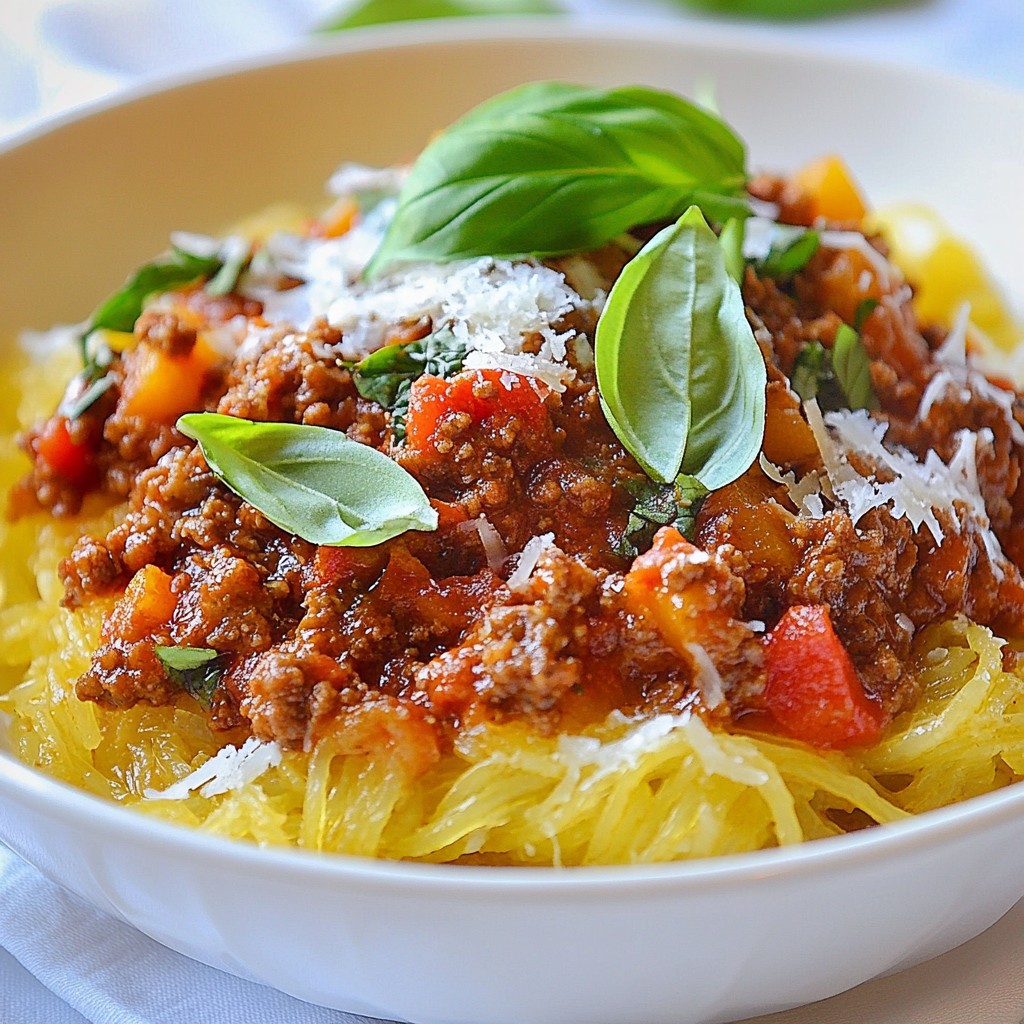
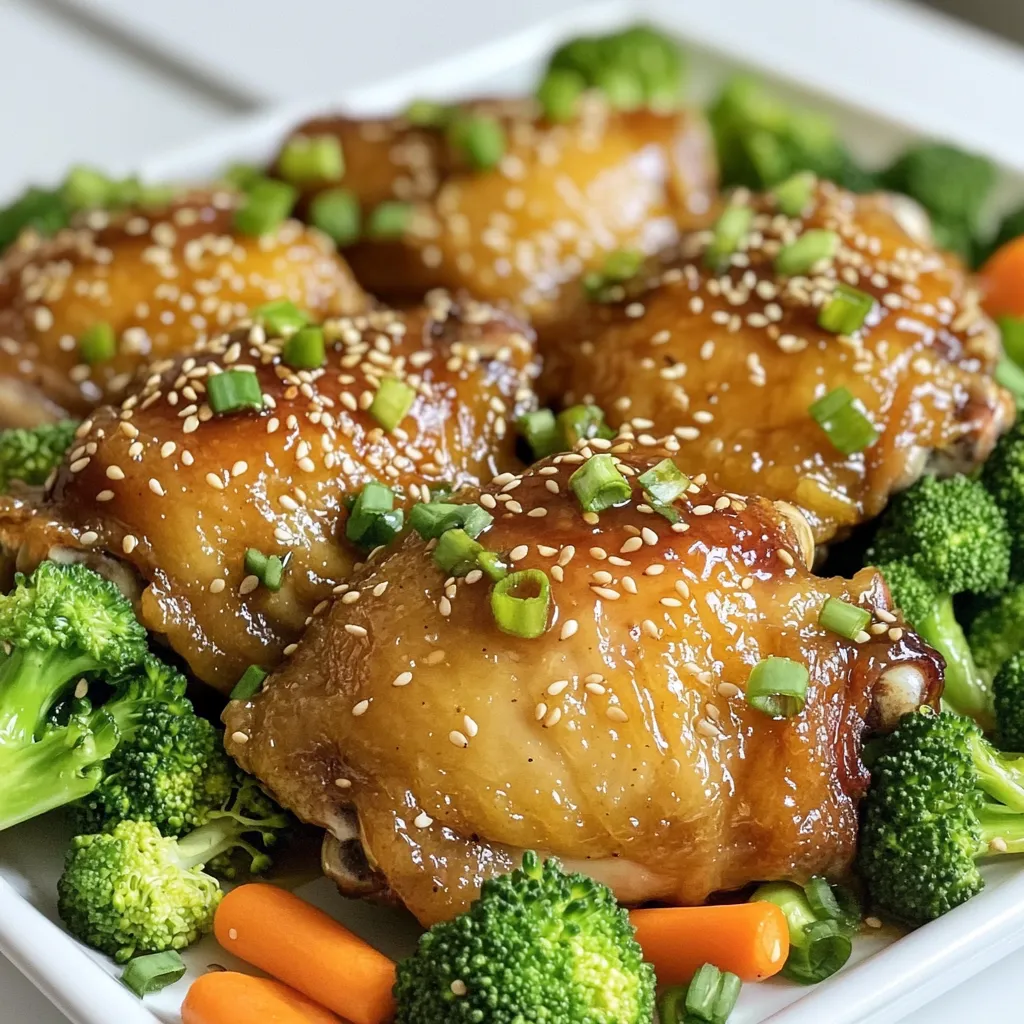
Are you ready to transform your dinner routine? The Honey Garlic Chicken Thighs One Pan Savory Delight will leave your taste buds dancing! With just a few simple ingredients, you can whip up a mouthwatering dish that’s easy to prepare and clean up. In this post, I’ll guide you through each step to create tender, flavorful chicken and vibrant veggies—all in one pan. Let’s get cooking!

- 4 bone-in, skin-on chicken thighs - 2 tablespoons olive oil - 4 cloves garlic, minced - 1/3 cup honey - 1/4 cup low-sodium soy sauce - 1 tablespoon rice vinegar - 1 teaspoon freshly grated ginger - Salt and pepper to taste - 1 cup fresh broccoli florets - 1 cup baby carrots - 1 tablespoon sesame seeds for garnish - 2 green onions, chopped for garnish - Salt and pepper - Optional spices for extra flavor When making Honey Garlic Chicken Thighs, you need simple yet fresh ingredients. The chicken thighs bring rich flavor and juiciness. I love using bone-in, skin-on thighs because they stay moist in the oven. The olive oil helps create a nice sear, which adds texture. The garlic, honey, and soy sauce form a sweet and savory sauce. Rice vinegar adds a slight tang, while ginger adds warmth. For veggies, fresh broccoli and baby carrots not only taste great but also add color. Don’t forget the garnishes! Sesame seeds and green onions give a lovely finish. Salt and pepper are essential to enhance all the flavors. Keep it simple, but feel free to add your favorite spices for a twist. Each ingredient plays a key role in making this dish a savory delight! - Preheat the oven to 400°F (200°C). This helps cook the chicken evenly. - Pat the chicken thighs dry with a paper towel. This step makes the skin crispy. - Season both sides of the chicken with salt and pepper. Use enough to bring out the flavor. - Heat 2 tablespoons of olive oil in an oven-proof skillet over medium-high heat. Wait until it shimmers. - Place the chicken thighs in the skillet, skin-side down. Sear them for 5-7 minutes. Don’t move them; let them brown. - Flip the thighs and cook for another 5 minutes. This gives them a nice color. Transfer the chicken to a plate and set aside. - Lower the heat to medium. In the same skillet, add 4 minced garlic cloves. Sauté for about 1 minute until fragrant. - Add 1/3 cup honey, 1/4 cup low-sodium soy sauce, 1 tablespoon rice vinegar, and 1 teaspoon freshly grated ginger. Stir well. - Let the sauce simmer for 2-3 minutes. This thickens it nicely and blends the flavors. - Toss in 1 cup of fresh broccoli florets and 1 cup of baby carrots. Make sure they are well-coated in the sauce. - Return the seared chicken to the skillet, skin-side up. This helps the skin stay crispy during baking. - Carefully transfer the skillet to the preheated oven. Bake for 25-30 minutes. - Check if the chicken is cooked through. It should reach an internal temperature of 165°F (75°C). The veggies should be tender. - Let the dish rest for a few minutes after baking. This helps the flavors meld together. - Before serving, sprinkle 1 tablespoon of sesame seeds and 2 chopped green onions over the chicken and vegetables. This adds a nice touch! To get crispy skin on your chicken, start by patting the chicken dry. This step is key. Water on the skin can make it soggy. Use a paper towel to remove moisture. Next, season the chicken well with salt and pepper. Now, let’s talk about searing. Heat olive oil in your oven-proof skillet over medium-high heat. You want it hot enough to shimmer. Place the chicken skin-side down without moving it. Cook for 5-7 minutes until it turns golden brown. Flip the thighs and cook for another 5 minutes. This method locks in moisture and flavor. To save time, you can marinate the chicken in advance. Mix honey, soy sauce, and garlic to create a simple marinade. Place the chicken in a bag or bowl with the marinade, then refrigerate for 1-2 hours. This step adds flavor and makes the chicken tender. If you have leftovers, here’s how to freeze them properly. Allow the chicken to cool completely. Then, place it in an airtight container or freezer bag. Make sure to remove as much air as possible to prevent freezer burn. It will keep well for up to three months. Want to take the flavor up a notch? You can add spices like smoked paprika or chili flakes for a kick. A dash of cumin can also enhance the dish. Pair your honey garlic chicken with sides like rice or mashed potatoes. Fresh salads or steamed veggies also work great. They balance the sweetness of the chicken and add freshness to your plate. {{image_4}} You can swap chicken thighs for other proteins. Try using chicken breasts for a leaner option. They cook faster, so check doneness sooner. For a plant-based choice, use firm tofu. Press the tofu to remove excess water, then cut it into cubes. Sear the tofu until golden brown before adding it to the sauce. You can change the veggies based on what you have. Fresh green beans, bell peppers, or snap peas work great. If you have seasonal vegetables, like zucchini or asparagus, toss those in too. Just make sure to cut them into similar sizes for even cooking. This way, all the veggies get tender at the same time. To change the sweetness, use less honey. You can replace some honey with lime juice or vinegar for a tangy touch. Want it spicier? Add red pepper flakes or chopped chili peppers to the sauce. This will make the dish burst with flavor and heat. Just remember to taste as you go to find your perfect mix. To keep your honey garlic chicken thighs fresh, place leftovers in an airtight container. Make sure the dish cools to room temperature before sealing. Store in the fridge for up to three days. For best taste, enjoy within the first two days. When ready to eat, you can reheat in the oven or microwave. For the oven, preheat to 350°F (175°C). Place the chicken in a baking dish and cover it with foil to keep it moist. Heat for about 15-20 minutes. In the microwave, use a microwave-safe plate. Cover with a damp paper towel and heat in 1-minute intervals until warm. In the fridge, honey garlic chicken thighs last up to three days. If you want to keep them longer, freeze the dish. In the freezer, it can last up to three months. Just remember to label your container with the date so you can track freshness easily. Cook chicken thighs at 400°F (200°C) for 25-30 minutes. This allows them to cook through and stay juicy. The internal temperature should reach 165°F (75°C). Use a meat thermometer for accuracy. Yes, boneless chicken thighs work well. They cook faster than bone-in thighs. Reduce the cooking time to about 20-25 minutes. Check for the same internal temperature. Pair the chicken with rice or quinoa for a filling meal. A fresh salad adds crunch and color. Steamed veggies also go well with the dish. Try garlic bread for a tasty side, too. Searing adds flavor and helps the skin become crispy. It locks in juices, making the chicken tender. You can skip it, but the dish may lack depth. Baking directly will not achieve the same crispiness. Yes, you can use gluten-free soy sauce or tamari. These options provide the same flavor without gluten. You can also use coconut aminos for a different taste profile. Adjust the sweetness if needed to balance flavors. This recipe blends simple ingredients to create a flavorful dish. You learned to make honey garlic chicken thighs with crispy skin and fresh veggies. The honey garlic sauce pairs well with various proteins and vegetables, enhancing your meal's taste. Remember, you can customize this dish to suit your preferences or dietary needs. Don't hesitate to experiment with seasonings or sides. Enjoy your cooking journey, and share your experience with others!

Ingredients

Main Ingredients List

– 4 bone-in, skin-on chicken thighs

– 2 tablespoons olive oil

– 4 cloves garlic, minced

– 1/3 cup honey

– 1/4 cup low-sodium soy sauce

– 1 tablespoon rice vinegar

– 1 teaspoon freshly grated ginger

– Salt and pepper to taste

Vegetables and Garnishes

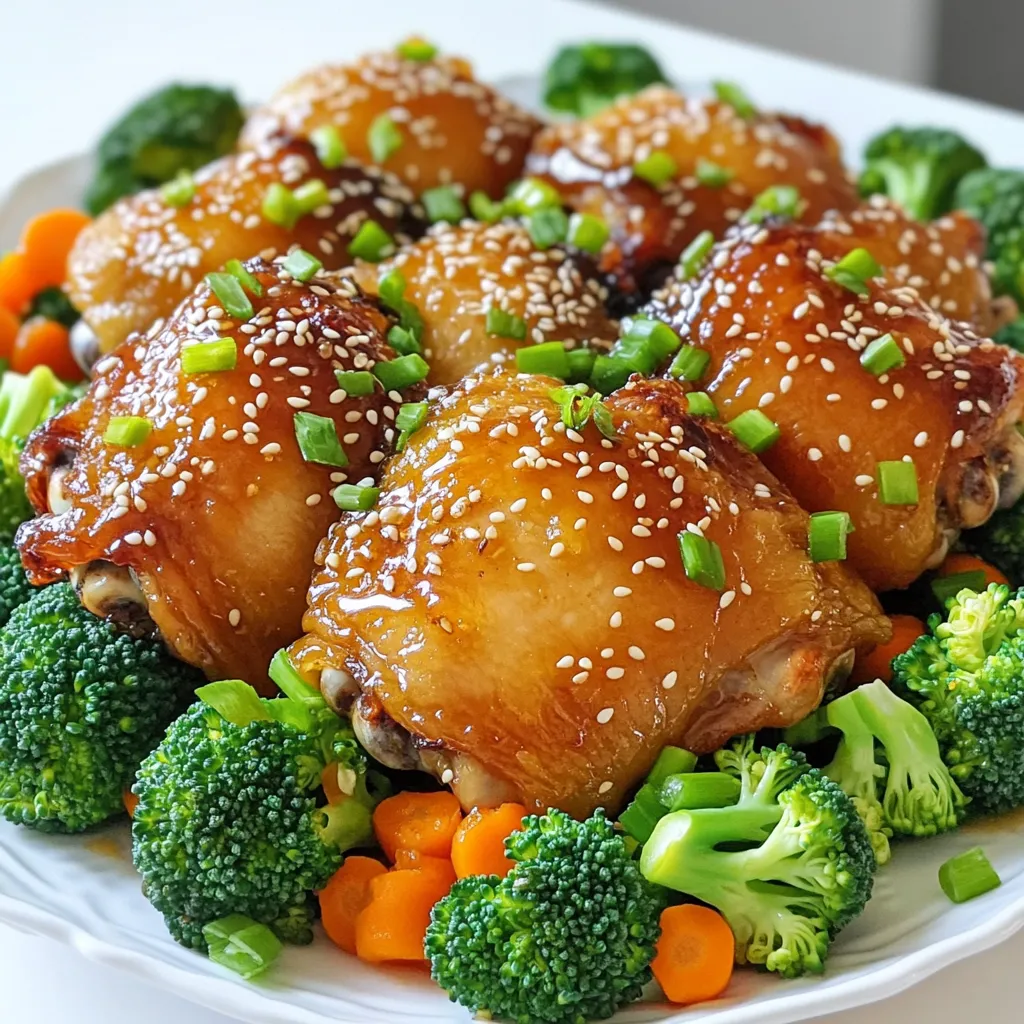
– 1 cup fresh broccoli florets

– 1 cup baby carrots

– 1 tablespoon sesame seeds for garnish

– 2 green onions, chopped for garnish

Seasoning and Flavor Enhancers

– Salt and pepper

– Optional spices for extra flavor

When making Honey Garlic Chicken Thighs, you need simple yet fresh ingredients. The chicken thighs bring rich flavor and juiciness. I love using bone-in, skin-on thighs because they stay moist in the oven. The olive oil helps create a nice sear, which adds texture.

The garlic, honey, and soy sauce form a sweet and savory sauce. Rice vinegar adds a slight tang, while ginger adds warmth. For veggies, fresh broccoli and baby carrots not only taste great but also add color.

Don’t forget the garnishes! Sesame seeds and green onions give a lovely finish. Salt and pepper are essential to enhance all the flavors. Keep it simple, but feel free to add your favorite spices for a twist. Each ingredient plays a key role in making this dish a savory delight!

Step-by-Step Instructions

Preheating and Preparation

– Preheat the oven to 400°F (200°C). This helps cook the chicken evenly.

– Pat the chicken thighs dry with a paper towel. This step makes the skin crispy.

– Season both sides of the chicken with salt and pepper. Use enough to bring out the flavor.

Searing the Chicken

– Heat 2 tablespoons of olive oil in an oven-proof skillet over medium-high heat. Wait until it shimmers.

– Place the chicken thighs in the skillet, skin-side down. Sear them for 5-7 minutes. Don’t move them; let them brown.

– Flip the thighs and cook for another 5 minutes. This gives them a nice color. Transfer the chicken to a plate and set aside.

Making the Honey Garlic Sauce

– Lower the heat to medium. In the same skillet, add 4 minced garlic cloves. Sauté for about 1 minute until fragrant.

– Add 1/3 cup honey, 1/4 cup low-sodium soy sauce, 1 tablespoon rice vinegar, and 1 teaspoon freshly grated ginger. Stir well.

– Let the sauce simmer for 2-3 minutes. This thickens it nicely and blends the flavors.

Combining Ingredients in One Pan

– Toss in 1 cup of fresh broccoli florets and 1 cup of baby carrots. Make sure they are well-coated in the sauce.

– Return the seared chicken to the skillet, skin-side up. This helps the skin stay crispy during baking.

Baking the Dish

– Carefully transfer the skillet to the preheated oven. Bake for 25-30 minutes.

– Check if the chicken is cooked through. It should reach an internal temperature of 165°F (75°C). The veggies should be tender.

Garnishing and Serving

– Let the dish rest for a few minutes after baking. This helps the flavors meld together.

– Before serving, sprinkle 1 tablespoon of sesame seeds and 2 chopped green onions over the chicken and vegetables. This adds a nice touch!

Tips & Tricks

Achieving Crispy Skin

To get crispy skin on your chicken, start by patting the chicken dry. This step is key. Water on the skin can make it soggy. Use a paper towel to remove moisture. Next, season the chicken well with salt and pepper.

Now, let’s talk about searing. Heat olive oil in your oven-proof skillet over medium-high heat. You want it hot enough to shimmer. Place the chicken skin-side down without moving it. Cook for 5-7 minutes until it turns golden brown. Flip the thighs and cook for another 5 minutes. This method locks in moisture and flavor.

Making Ahead and Freezing

To save time, you can marinate the chicken in advance. Mix honey, soy sauce, and garlic to create a simple marinade. Place the chicken in a bag or bowl with the marinade, then refrigerate for 1-2 hours. This step adds flavor and makes the chicken tender.

If you have leftovers, here’s how to freeze them properly. Allow the chicken to cool completely. Then, place it in an airtight container or freezer bag. Make sure to remove as much air as possible to prevent freezer burn. It will keep well for up to three months.

Enhancing the Flavor

Want to take the flavor up a notch? You can add spices like smoked paprika or chili flakes for a kick. A dash of cumin can also enhance the dish.

Pair your honey garlic chicken with sides like rice or mashed potatoes. Fresh salads or steamed veggies also work great. They balance the sweetness of the chicken and add freshness to your plate.

Variations

Substituting Proteins

You can swap chicken thighs for other proteins. Try using chicken breasts for a leaner option. They cook faster, so check doneness sooner. For a plant-based choice, use firm tofu. Press the tofu to remove excess water, then cut it into cubes. Sear the tofu until golden brown before adding it to the sauce.

Different Vegetables

You can change the veggies based on what you have. Fresh green beans, bell peppers, or snap peas work great. If you have seasonal vegetables, like zucchini or asparagus, toss those in too. Just make sure to cut them into similar sizes for even cooking. This way, all the veggies get tender at the same time.

Adjusting Sweetness and Flavor

To change the sweetness, use less honey. You can replace some honey with lime juice or vinegar for a tangy touch. Want it spicier? Add red pepper flakes or chopped chili peppers to the sauce. This will make the dish burst with flavor and heat. Just remember to taste as you go to find your perfect mix.

Storage Info

Storing Leftovers

To keep your honey garlic chicken thighs fresh, place leftovers in an airtight container. Make sure the dish cools to room temperature before sealing. Store in the fridge for up to three days. For best taste, enjoy within the first two days.

Reheating Instructions

When ready to eat, you can reheat in the oven or microwave. For the oven, preheat to 350°F (175°C). Place the chicken in a baking dish and cover it with foil to keep it moist. Heat for about 15-20 minutes. In the microwave, use a microwave-safe plate. Cover with a damp paper towel and heat in 1-minute intervals until warm.

Shelf Life

In the fridge, honey garlic chicken thighs last up to three days. If you want to keep them longer, freeze the dish. In the freezer, it can last up to three months. Just remember to label your container with the date so you can track freshness easily.

FAQs

How long to cook chicken thighs in the oven?

Cook chicken thighs at 400°F (200°C) for 25-30 minutes. This allows them to cook through and stay juicy. The internal temperature should reach 165°F (75°C). Use a meat thermometer for accuracy.

Can I use boneless chicken thighs instead?

Yes, boneless chicken thighs work well. They cook faster than bone-in thighs. Reduce the cooking time to about 20-25 minutes. Check for the same internal temperature.

What to serve with honey garlic chicken thighs?

Pair the chicken with rice or quinoa for a filling meal. A fresh salad adds crunch and color. Steamed veggies also go well with the dish. Try garlic bread for a tasty side, too.

Is it necessary to sear the chicken first?

Searing adds flavor and helps the skin become crispy. It locks in juices, making the chicken tender. You can skip it, but the dish may lack depth. Baking directly will not achieve the same crispiness.

Can I adjust the sauce to make it gluten-free?

Yes, you can use gluten-free soy sauce or tamari. These options provide the same flavor without gluten. You can also use coconut aminos for a different taste profile. Adjust the sweetness if needed to balance flavors.

This recipe blends simple ingredients to create a flavorful dish. You learned to make honey garlic chicken thighs with crispy skin and fresh veggies. The honey garlic sauce pairs well with various proteins and vegetables, enhancing your meal’s taste. Remember, you can customize this dish to suit your preferences or dietary needs. Don’t hesitate to experiment with seasonings or sides. Enjoy your cooking journey, and share your experience with others!

- 4 bone-in, skin-on chicken thighs - 2 tablespoons olive oil - 4 cloves garlic, minced - 1/3 cup honey - 1/4 cup low-sodium soy sauce - 1 tablespoon rice vinegar - 1 teaspoon freshly grated ginger - Salt and pepper to taste - 1 cup fresh broccoli florets - 1 cup baby carrots - 1 tablespoon sesame seeds for garnish - 2 green onions, chopped for garnish - Salt and pepper - Optional spices for extra flavor When making Honey Garlic Chicken Thighs, you need simple yet fresh ingredients. The chicken thighs bring rich flavor and juiciness. I love using bone-in, skin-on thighs because they stay moist in the oven. The olive oil helps create a nice sear, which adds texture. The garlic, honey, and soy sauce form a sweet and savory sauce. Rice vinegar adds a slight tang, while ginger adds warmth. For veggies, fresh broccoli and baby carrots not only taste great but also add color. Don’t forget the garnishes! Sesame seeds and green onions give a lovely finish. Salt and pepper are essential to enhance all the flavors. Keep it simple, but feel free to add your favorite spices for a twist. Each ingredient plays a key role in making this dish a savory delight! - Preheat the oven to 400°F (200°C). This helps cook the chicken evenly. - Pat the chicken thighs dry with a paper towel. This step makes the skin crispy. - Season both sides of the chicken with salt and pepper. Use enough to bring out the flavor. - Heat 2 tablespoons of olive oil in an oven-proof skillet over medium-high heat. Wait until it shimmers. - Place the chicken thighs in the skillet, skin-side down. Sear them for 5-7 minutes. Don’t move them; let them brown. - Flip the thighs and cook for another 5 minutes. This gives them a nice color. Transfer the chicken to a plate and set aside. - Lower the heat to medium. In the same skillet, add 4 minced garlic cloves. Sauté for about 1 minute until fragrant. - Add 1/3 cup honey, 1/4 cup low-sodium soy sauce, 1 tablespoon rice vinegar, and 1 teaspoon freshly grated ginger. Stir well. - Let the sauce simmer for 2-3 minutes. This thickens it nicely and blends the flavors. - Toss in 1 cup of fresh broccoli florets and 1 cup of baby carrots. Make sure they are well-coated in the sauce. - Return the seared chicken to the skillet, skin-side up. This helps the skin stay crispy during baking. - Carefully transfer the skillet to the preheated oven. Bake for 25-30 minutes. - Check if the chicken is cooked through. It should reach an internal temperature of 165°F (75°C). The veggies should be tender. - Let the dish rest for a few minutes after baking. This helps the flavors meld together. - Before serving, sprinkle 1 tablespoon of sesame seeds and 2 chopped green onions over the chicken and vegetables. This adds a nice touch! To get crispy skin on your chicken, start by patting the chicken dry. This step is key. Water on the skin can make it soggy. Use a paper towel to remove moisture. Next, season the chicken well with salt and pepper. Now, let’s talk about searing. Heat olive oil in your oven-proof skillet over medium-high heat. You want it hot enough to shimmer. Place the chicken skin-side down without moving it. Cook for 5-7 minutes until it turns golden brown. Flip the thighs and cook for another 5 minutes. This method locks in moisture and flavor. To save time, you can marinate the chicken in advance. Mix honey, soy sauce, and garlic to create a simple marinade. Place the chicken in a bag or bowl with the marinade, then refrigerate for 1-2 hours. This step adds flavor and makes the chicken tender. If you have leftovers, here’s how to freeze them properly. Allow the chicken to cool completely. Then, place it in an airtight container or freezer bag. Make sure to remove as much air as possible to prevent freezer burn. It will keep well for up to three months. Want to take the flavor up a notch? You can add spices like smoked paprika or chili flakes for a kick. A dash of cumin can also enhance the dish. Pair your honey garlic chicken with sides like rice or mashed potatoes. Fresh salads or steamed veggies also work great. They balance the sweetness of the chicken and add freshness to your plate. {{image_4}} You can swap chicken thighs for other proteins. Try using chicken breasts for a leaner option. They cook faster, so check doneness sooner. For a plant-based choice, use firm tofu. Press the tofu to remove excess water, then cut it into cubes. Sear the tofu until golden brown before adding it to the sauce. You can change the veggies based on what you have. Fresh green beans, bell peppers, or snap peas work great. If you have seasonal vegetables, like zucchini or asparagus, toss those in too. Just make sure to cut them into similar sizes for even cooking. This way, all the veggies get tender at the same time. To change the sweetness, use less honey. You can replace some honey with lime juice or vinegar for a tangy touch. Want it spicier? Add red pepper flakes or chopped chili peppers to the sauce. This will make the dish burst with flavor and heat. Just remember to taste as you go to find your perfect mix. To keep your honey garlic chicken thighs fresh, place leftovers in an airtight container. Make sure the dish cools to room temperature before sealing. Store in the fridge for up to three days. For best taste, enjoy within the first two days. When ready to eat, you can reheat in the oven or microwave. For the oven, preheat to 350°F (175°C). Place the chicken in a baking dish and cover it with foil to keep it moist. Heat for about 15-20 minutes. In the microwave, use a microwave-safe plate. Cover with a damp paper towel and heat in 1-minute intervals until warm. In the fridge, honey garlic chicken thighs last up to three days. If you want to keep them longer, freeze the dish. In the freezer, it can last up to three months. Just remember to label your container with the date so you can track freshness easily. Cook chicken thighs at 400°F (200°C) for 25-30 minutes. This allows them to cook through and stay juicy. The internal temperature should reach 165°F (75°C). Use a meat thermometer for accuracy. Yes, boneless chicken thighs work well. They cook faster than bone-in thighs. Reduce the cooking time to about 20-25 minutes. Check for the same internal temperature. Pair the chicken with rice or quinoa for a filling meal. A fresh salad adds crunch and color. Steamed veggies also go well with the dish. Try garlic bread for a tasty side, too. Searing adds flavor and helps the skin become crispy. It locks in juices, making the chicken tender. You can skip it, but the dish may lack depth. Baking directly will not achieve the same crispiness. Yes, you can use gluten-free soy sauce or tamari. These options provide the same flavor without gluten. You can also use coconut aminos for a different taste profile. Adjust the sweetness if needed to balance flavors. This recipe blends simple ingredients to create a flavorful dish. You learned to make honey garlic chicken thighs with crispy skin and fresh veggies. The honey garlic sauce pairs well with various proteins and vegetables, enhancing your meal's taste. Remember, you can customize this dish to suit your preferences or dietary needs. Don't hesitate to experiment with seasonings or sides. Enjoy your cooking journey, and share your experience with others!

Honey Garlic Chicken Thighs One Pan

Savor the deliciousness of Honey Garlic Chicken Thighs One Pan! This easy recipe combines tender chicken, crisp veggies, and a sweet-savory honey garlic sauce, all cooked in one skillet. Perfect for busy weeknights, your family will love this flavorful meal. Follow the simple steps to create a dish that impresses without the fuss. Click through to explore this recipe and make your dinner extraordinary! #HoneyGarlicChicken #OnePanRecipes #EasyDinner #ChickenThighs

Ingredients
  

4 bone-in, skin-on chicken thighs

Salt and pepper to taste

2 tablespoons olive oil

4 cloves garlic, minced

1/3 cup honey

1/4 cup low-sodium soy sauce

1 tablespoon rice vinegar

1 teaspoon freshly grated ginger

1 cup fresh broccoli florets

1 cup baby carrots

1 tablespoon sesame seeds (for garnish)

2 green onions, chopped (for garnish)

Instructions
 

Preheat the Oven: Begin by preheating your oven to 400°F (200°C) to ensure it's hot when the time comes to bake the dish.

    Season the Chicken: Use a paper towel to pat the chicken thighs dry, which helps achieve crispier skin. Generously season both sides of the chicken with salt and freshly cracked pepper.

      Sear the Chicken: In a large oven-proof skillet, heat the olive oil over medium-high heat until shimmering. Carefully place the chicken thighs in the skillet, skin-side down. Sear for approximately 5-7 minutes, without moving them, until the skin develops a beautiful golden-brown color. Flip the thighs and cook for an additional 5 minutes. Once seared, transfer the chicken to a plate and set aside.

        Prepare the Sauce: Lower the heat to medium and, in the same skillet, add the minced garlic. Sauté for about 1 minute until fragrant, being careful to avoid burning the garlic. Next, pour in the honey, soy sauce, rice vinegar, and grated ginger. Stir well to combine all the flavors and allow the mixture to simmer for 2-3 minutes until it slightly thickens.

          Add Veggies: Toss the broccoli florets and baby carrots into the sauce, ensuring they are well-coated. Return the seared chicken thighs to the skillet, placing them skin-side up over the vegetables.

            Bake: Carefully transfer the entire skillet to your preheated oven. Bake for 25-30 minutes, or until the chicken is fully cooked, reaching an internal temperature of 165°F (75°C), and the vegetables are tender.

              Garnish and Serve: Once out of the oven, allow the dish to rest for a few minutes for the flavors to meld. Before serving, sprinkle sesame seeds and chopped green onions over the chicken and vegetables for a delightful finish.

                Prep Time: 10 minutes | Total Time: 50 minutes | Servings: 4

                  - Presentation Tips: Serve directly from the skillet for a rustic look or transfer to a large serving platter, drizzling extra sauce over the chicken and vegetables for added appeal.

                    WANT TO SAVE THIS RECIPE?

                    Secret Link