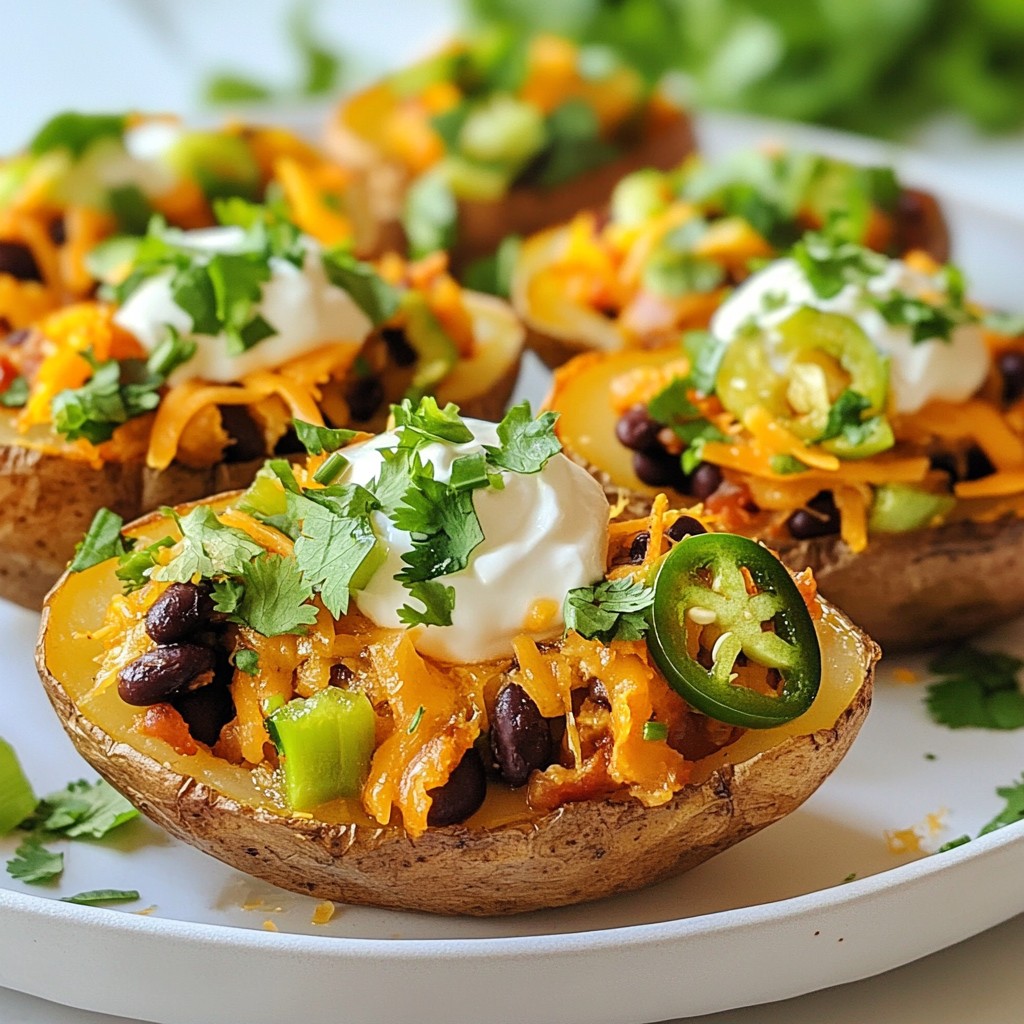
Get ready to transform your snacking game with Loaded Nacho Potato Skins! This recipe combines crispy potato skins with all your favorite nacho toppings, creating a delightful treat that's perfect for any occasion. In this post, I'll guide you through the simple steps to make this flavorful snack. Let’s dive into this tasty adventure that will impress your friends and family alike!
Why I Love This Recipe
- Delicious Flavor Combination: The mixture of cheesy goodness, hearty black beans, and a kick from jalapeños creates an irresistible flavor explosion.
- Customizable Toppings: These loaded nacho potato skins can be topped with your favorite ingredients, allowing for endless variations to suit your taste.
- Perfect for Sharing: These snacks are great for parties or game days, making them a hit among friends and family.
- Easy to Prepare: This recipe is straightforward, requiring minimal prep and cooking time, so you can enjoy delicious food without the hassle.
Ingredients
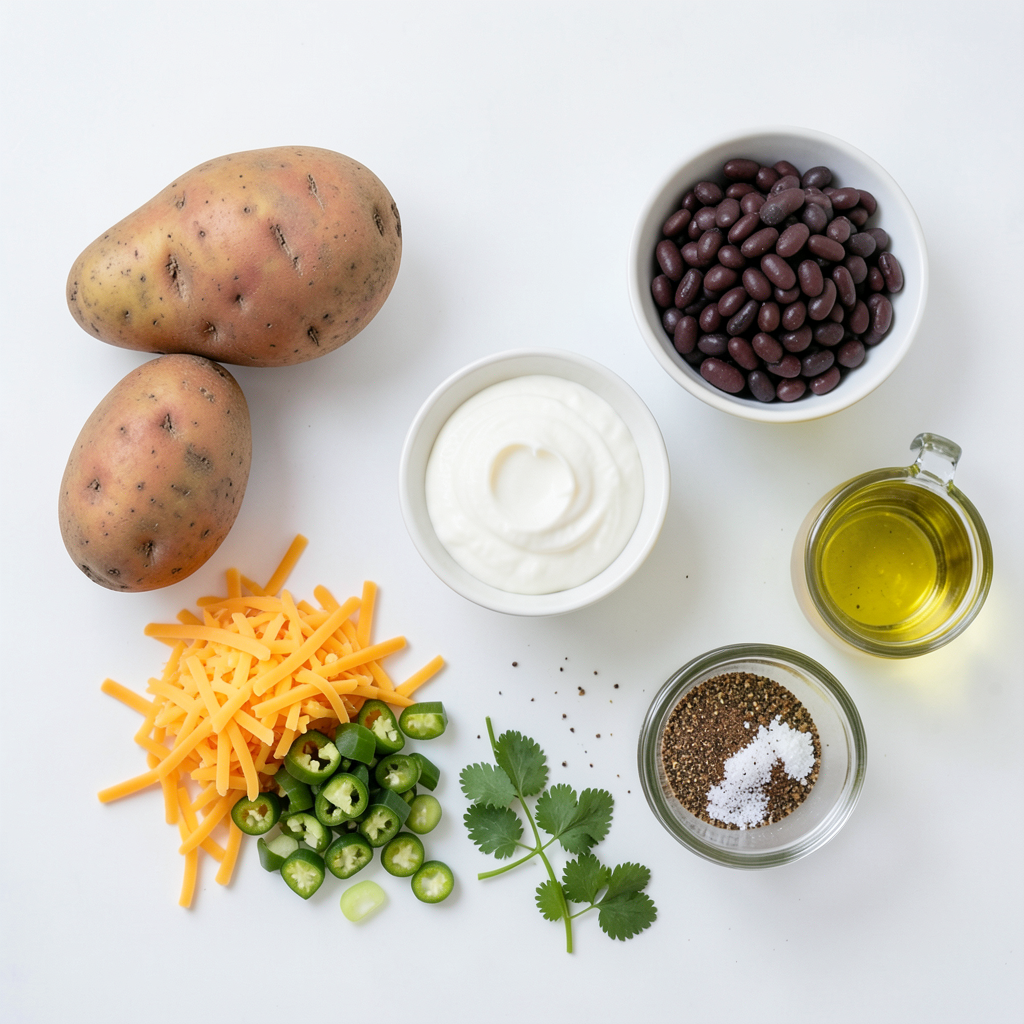
To make loaded nacho potato skins, gather these tasty ingredients:
- 4 medium-sized russet potatoes
- 1 cup shredded cheddar cheese
- ½ cup sour cream
- 1 cup cooked black beans (canned or boiled, drained)
- 1 jalapeño, diced (seeds removed for milder flavor)
- ¼ cup green onions, sliced
- 1 teaspoon taco seasoning (optional for added flavor)
- Olive oil (for brushing on potatoes)
- Salt and pepper (to taste)
- Fresh cilantro (for garnish, optional)
These ingredients come together to create a snack that is both hearty and full of flavor. The russet potatoes provide a sturdy base. The cheddar cheese melts beautifully, making each bite delicious. Black beans add protein and texture. Jalapeños give a kick, while sour cream adds creaminess. Green onions bring brightness, and cilantro adds a fresh touch.
Feel free to adjust the ingredients based on your taste. Want it spicier? Add more jalapeños! Prefer it milder? Skip the taco seasoning. This recipe is flexible, making it easy to customize. Enjoy your cooking experience!
Step-by-Step Instructions
Preheat the Oven
Start by preheating your oven to 400°F (200°C). This heat will help cook the potatoes evenly.
Bake the Potatoes
Wash the russet potatoes well under cold water. Use a fork to poke several holes in each potato. This step helps the steam escape while baking. Place the potatoes on a baking sheet. Lightly brush them with olive oil and sprinkle with salt. Bake for about 45 to 60 minutes or until they are soft. You should be able to poke them with a fork easily.
Prepare Potato Skins
After baking, carefully remove the potatoes from the oven. Let them cool for a few minutes. Then, lower the oven temperature to 375°F (190°C). Cut each potato in half lengthwise. Use a spoon to scoop out some of the flesh, but leave enough for support. Save the flesh for another dish, like mashed potatoes.
Fill and Top the Skins
Brush the insides of the potato skins with a bit of olive oil. Season with salt and pepper to taste. Place the skins cut side up on the baking sheet. Sprinkle half of the shredded cheddar cheese in each skin. In a mixing bowl, combine the black beans, diced jalapeño, green onions, and taco seasoning if you want. Stir well and fill each potato skin with this mix. Top with the rest of the cheddar cheese.
Final Baking Process
Put the baking sheet back in the oven. Bake for another 10 to 15 minutes. Look for the cheese to melt and bubble up, turning lightly golden.
Garnish and Serve
Take the potato skins out of the oven and let them cool slightly. Serve them warm, topped with a dollop of sour cream. If you like, sprinkle fresh cilantro on top for added flavor and color.
Tips & Tricks
Choosing the Right Potatoes
For loaded nacho potato skins, select medium-sized russet potatoes. They have a thick skin and a fluffy inside. These qualities help hold the toppings well. You want potatoes that feel firm and heavy. Avoid any that have soft spots or blemishes.
How to Achieve Crispy Potato Skins
To make your potato skins crispy, first, poke holes in the potatoes before baking. This allows steam to escape. After baking, brush the insides with olive oil and season with salt. Bake them again until the cheese melts and the edges turn golden brown. This extra step adds that perfect crunch.
Alternative Toppings for Variation
Feel free to get creative with your toppings! You can use different kinds of cheese, such as pepper jack or mozzarella. Try adding cooked bacon bits or diced tomatoes for extra flavor. For a healthier twist, load up on veggies like bell peppers or corn. The choices are endless!
Pro Tips
- Choose the Right Potatoes: Opt for russet potatoes as they have a high starch content, making them perfect for a fluffy interior.
- Don’t Skimp on Seasoning: Season the potato skins well with salt and pepper to enhance the overall flavor of the dish.
- Layering Cheese: Sprinkling cheese both before and after adding the filling creates a deliciously melty and cheesy topping.
- Experiment with Toppings: Feel free to add your favorite toppings like avocado, salsa, or more veggies for a personalized twist.
Variations
Vegetarian Options
You can easily make loaded nacho potato skins vegetarian. Replace the black beans with refried beans for a creamier texture. Add corn for a sweet crunch. You can also include diced bell peppers for extra flavor. Use your favorite veggies to make this dish more colorful and fun.
Meat Lover's Loaded Nacho Potato Skins
If you love meat, add cooked ground beef or shredded chicken. Mix the meat with taco seasoning for a spicy kick. Top the potato skins with the meat mixture before adding cheese. This will make your loaded nacho potato skins hearty and filling. Everyone will enjoy this meaty twist.
Different Cheese Combinations
Cheese makes everything better! Try mixing cheddar cheese with pepper jack for a kick. You can also use mozzarella for a gooey texture. A blend of cheeses adds depth and flavor. Feel free to experiment with different cheese types to find your perfect combo. Cheese is key to a tasty dish!
Storage Info
Refrigeration Guidelines
You can store leftover loaded nacho potato skins in the fridge. Place them in an airtight container. They will stay fresh for up to three days. Make sure they cool down before sealing. This helps avoid sogginess.
Freezing Instructions
If you want to freeze the potato skins, wrap them tightly in plastic wrap. Then, place them in a freezer-safe bag or container. They can last for about two months in the freezer. To use, thaw them in the fridge overnight before reheating.
Reheating Tips
To reheat, preheat your oven to 350°F (175°C). Place the potato skins on a baking sheet. Bake for about 10 to 15 minutes until they are hot. You can also use a microwave, but the skin may not stay crispy. To keep them crunchy, the oven is best. Enjoy your tasty snack!
FAQs
How long do loaded nacho potato skins last in the fridge?
Loaded nacho potato skins stay fresh in the fridge for about 3 to 5 days. Make sure you store them in an airtight container. This keeps them from drying out. If you notice any odd smells or changes in texture, it's best to toss them.
Can I make loaded nacho potato skins in advance?
Yes, you can make loaded nacho potato skins in advance! Prepare the potato skins and filling, then store them separately. You can assemble them before baking. This way, you save time when it's snack time.
What are some good dipping sauces for loaded nacho potato skins?
Several tasty sauces pair well with loaded nacho potato skins. Here are a few great options:
- Salsa
- Guacamole
- Spicy ranch dressing
- Queso dip
These dips add extra flavor and fun to each bite.
How can I make these potato skins spicier?
To add heat to your loaded nacho potato skins, try these ideas:
- Use more jalapeños or leave in the seeds.
- Add some diced serrano or habanero peppers.
- Mix in spicy taco seasoning.
These changes will kick up the heat and excite your taste buds!
You learned how to make loaded nacho potato skins, from ingredients to storage tips. Choose the right potatoes for the best taste. Customize your toppings for fun variations. Don’t forget to try different cheeses and dips to mix it up. These tasty snacks are great for any event. Enjoy making them and sharing with friends! You'll impress everyone and have a blast in the kitchen. Keep experimenting to find your favorite combo.