Are you ready to impress your friends with a simple yet delicious dessert? No Bake Key Lime Cheesecake Cups are the perfect treat for any occasion! In this article, I’ll guide you step-by-step through this easy recipe. With a creamy filling and a zesty kick, these cups will delight your taste buds. So, grab your ingredients, and let’s make a dessert that everyone will love!
Why I Love This Recipe
- Easy to Make: This no-bake recipe requires minimal effort, making it perfect for quick desserts or last-minute gatherings.
- Refreshing Flavor: The bright and tangy key lime flavor is incredibly refreshing, especially during warm weather.
- Individual Portions: Serving in cups allows for easy portion control and a stylish presentation at parties.
- Customizable: You can easily adapt this recipe by adding different toppings or using various citrus fruits for a twist.
Ingredients
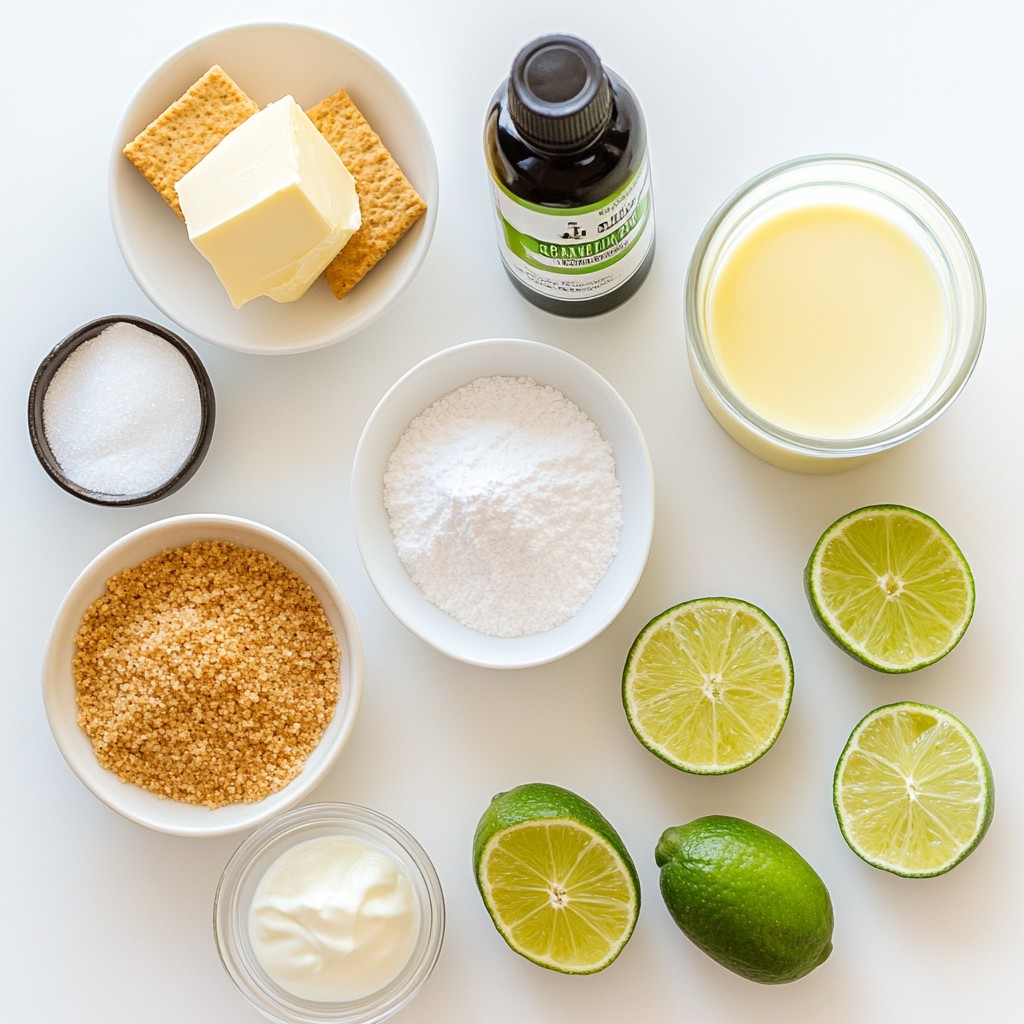
To make No Bake Key Lime Cheesecake Cups, you need fresh and simple ingredients. Each one adds to the flavor and texture. Here’s what you need:
- 1 cup graham cracker crumbs
- 2 tablespoons granulated sugar
- 1/4 cup unsalted butter, melted
- 16 oz cream cheese, softened to room temperature
- 1 cup powdered sugar
- 1/4 cup freshly squeezed key lime juice
- Zest from 2 key limes
- 1 teaspoon pure vanilla extract
- 1 cup heavy whipping cream
- Fresh lime slices and additional lime zest, for garnish
These ingredients are easy to find. The graham cracker crumbs form the crust. The cream cheese creates that smooth filling. The key lime juice gives the cups their bright, tangy flavor. Don't skip the garnish! Fresh lime slices and zest add a lovely touch. Enjoy gathering these ingredients; they will make your cheesecake cups shine.
Step-by-Step Instructions
Preparing the Crust
To start, gather your graham cracker crumbs and granulated sugar in a medium bowl. Next, pour in the melted butter. Use a fork to mix everything well. You want the crumbs to feel like wet sand. This texture helps form a great crust.
Layering the Cups
Now, take about 2 tablespoons of the crust mixture. Distribute this evenly into each cup. Use the back of a spoon to press down firmly. This creates a compact layer. Set your cups aside for the next steps.
Making the Cheesecake Filling
In a large bowl, add your softened cream cheese. Use an electric mixer to beat it on medium speed. Keep mixing until it is smooth and creamy. Slowly add in the powdered sugar. Keep beating until it blends well and no lumps remain.
Adding Flavors
Pour in the fresh key lime juice and zest. Also, add the vanilla extract. Mix on low speed until everything is well combined. The mixture should feel light and airy.
Whipping the Cream
In a separate bowl, take your heavy cream. Use a hand mixer to whip it until stiff peaks form. This usually takes about 2-3 minutes. Be careful not to overwhip, or it can become grainy.
Combining Mixtures and Filling
Gently fold the whipped cream into the cream cheese mixture using a spatula. Make sure to mix until you can’t see any streaks. This gives you a light and fluffy cheesecake filling.
Chilling the Cheesecake Cups
Cover your cups with plastic wrap. Place them in the fridge for at least 4 hours. This chilling time helps the cheesecake set. When it’s done, the filling should feel firm to the touch.
Garnishing and Serving
Once chilled, remove the wrap. Garnish each cup with a slice of fresh lime and a sprinkle of lime zest. This adds a pop of color and a fresh aroma. Enjoy your delightful treat!
Tips & Tricks
Pro Tips for Perfect Cheesecake Cups
To ensure your cheesecake cups shine, start with soft cream cheese. If the cream cheese is cold, it will clump. Let it sit out for about 30 minutes before mixing. This helps create a smooth filling with no lumps.
For the best texture, fold in the whipped cream gently. Use a spatula to combine. This keeps the mixture light and airy. Take your time and avoid stirring too hard.
Possible Mistakes to Avoid
One common mistake is overwhipping the cream. It should hold stiff peaks but not turn into butter. Whip until the cream is thick but still smooth.
Another mistake is not chilling the cheesecake long enough. It needs at least 4 hours in the fridge. This helps it set properly. If you skip this step, it won't hold its shape.
Recommended Tools and Equipment
Use a large mixing bowl for the cream cheese and a separate bowl for whipping the cream. A hand mixer speeds up the process. For serving, small glass cups or jars work best. They show off the layers and look pretty on a table.
Pro Tips
- Chill Your Ingredients: For the best texture, ensure your cream cheese is at room temperature and your heavy cream is cold. This helps achieve a smooth filling and stable whipped cream.
- Use Fresh Limes: Freshly squeezed key lime juice and zest will elevate the flavor of your cheesecake cups significantly compared to bottled alternatives.
- Don’t Overwhip the Cream: When whipping the heavy cream, stop as soon as stiff peaks form. Overwhipping can lead to a grainy texture, which is not ideal for a creamy cheesecake.
- Make Ahead: These cheesecake cups can be made a day in advance. They actually taste better after chilling overnight, allowing the flavors to meld beautifully.
Variations
Flavor Variations
You can change the flavor of your cheesecake cups by using different citrus juices. Try lemon or orange juice for a new twist. Each juice brings a unique taste that makes the dessert fun. You can also add fresh fruit toppings. Berries like strawberries, blueberries, or raspberries pair well with the lime flavor. Just slice the fruit and place it on top of the cheesecake before serving.
Dietary Adjustments
If you need a gluten-free version, swap the graham cracker crumbs for gluten-free crumbs. Many brands offer great options that taste just as good. For a low-sugar version, use a sugar substitute like stevia or monk fruit. These alternatives keep the sweet flavor without all the sugar. Always check the labels to ensure they fit your dietary needs.
Presentation Ideas
To make your cheesecake cups look special, decorate them with whipped cream. A simple swirl on top adds elegance. You can also use different styles of cups. Try small mason jars, fancy dessert glasses, or even clear plastic cups for casual gatherings. The right cup can make your dessert look professional and inviting.
Storage Info
Proper Storage Techniques
To keep your no-bake key lime cheesecake cups fresh, store them in the fridge. Cover each cup tightly with plastic wrap. This helps to seal in flavor and moisture. Place the cups on a flat surface in the fridge. They can stay fresh for up to three days. If you want to enjoy them later, consider freezing.
Freezing Instructions
If you have leftover cheesecake cups, you can freeze them. First, make sure they are fully set in the fridge. Cover each cup with plastic wrap, then place them in a freezer-safe container. They can last in the freezer for about one month.
To thaw, move the cups from the freezer to the fridge. Let them sit overnight to defrost. After thawing, you can garnish them with fresh lime slices and zest. This will bring back their bright flavors and make them look great!
FAQs
How long can No Bake Key Lime Cheesecake Cups last in the fridge?
You can store these cheesecake cups in the fridge for up to 4 days. Just keep them covered. This ensures they stay fresh and tasty.
Can I use regular limes instead of key limes?
Yes, you can use regular limes if key limes are not available. The taste will be slightly different, but they will still be delicious. Regular limes are easy to find and work well in this recipe.
Is it possible to make this recipe dairy-free?
Yes, you can make this recipe dairy-free. Use a dairy-free cream cheese and coconut cream instead of heavy cream. This gives a nice texture and flavor.
Can I prepare these cheesecake cups in advance?
Absolutely! You can make these cups a day ahead of time. Just make sure to chill them for at least 4 hours before serving. This helps all the flavors blend well.
What are the best types of cups to use for serving?
I recommend using small glass cups or dessert jars for serving. They look pretty and show off the layers. You can also use plastic cups for a casual gathering.
You’ve learned how to make delicious No Bake Key Lime Cheesecake Cups. We covered the key ingredients, step-by-step instructions, and tips for success. Remember to avoid overwhipping and under-chilling for the best results.
This dessert offers room for creativity with flavor and presentation variations. Proper storage helps keep these cups fresh. Whether for a party or a treat, these cups delight every time. Enjoy your cheesecake journey!