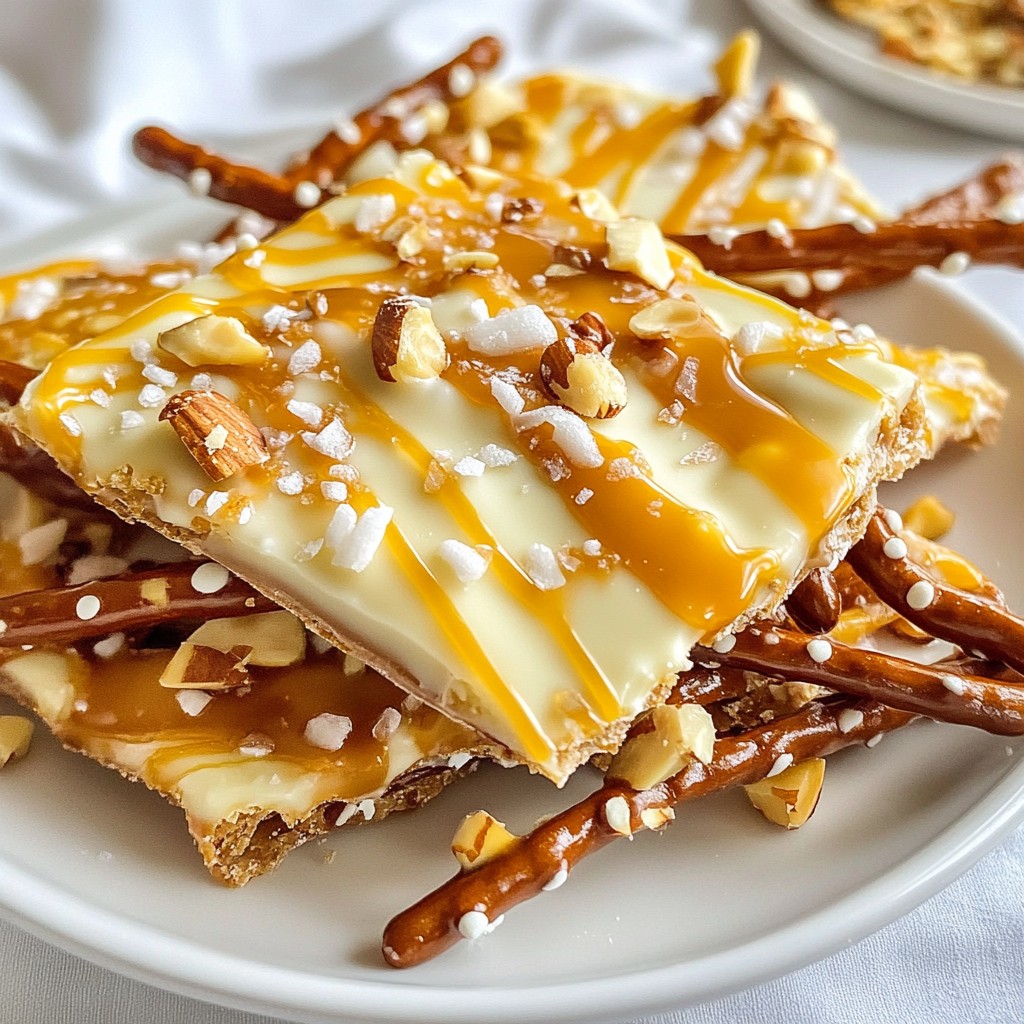
Are you ready to make a treat that is both crunchy and sweet? My Sweet and Salty Pretzel Bark is simple, fun, and oh-so-delicious! This recipe brings together the best flavors in one tasty bite. With just a few ingredients and easy steps, you can impress friends and family at any gathering. Let's dive into this delightful treat that combines salty pretzels and sweet chocolate. You won’t want to miss it!
Why I Love This Recipe
- Sweet and Salty Harmony: This pretzel bark perfectly balances the sweetness of chocolate and caramel with the saltiness of pretzels, creating an irresistible flavor combination.
- Easy to Make: This recipe requires minimal effort, making it perfect for both beginner bakers and seasoned chefs looking for a quick treat.
- Customizable Toppings: You can easily personalize this bark with your favorite nuts, sprinkles, or additional chocolate, making it a versatile dessert for any occasion.
- Great for Sharing: This treat is perfect for parties, gatherings, or as a thoughtful homemade gift, ensuring that everyone can enjoy a piece of this deliciousness.
Ingredients
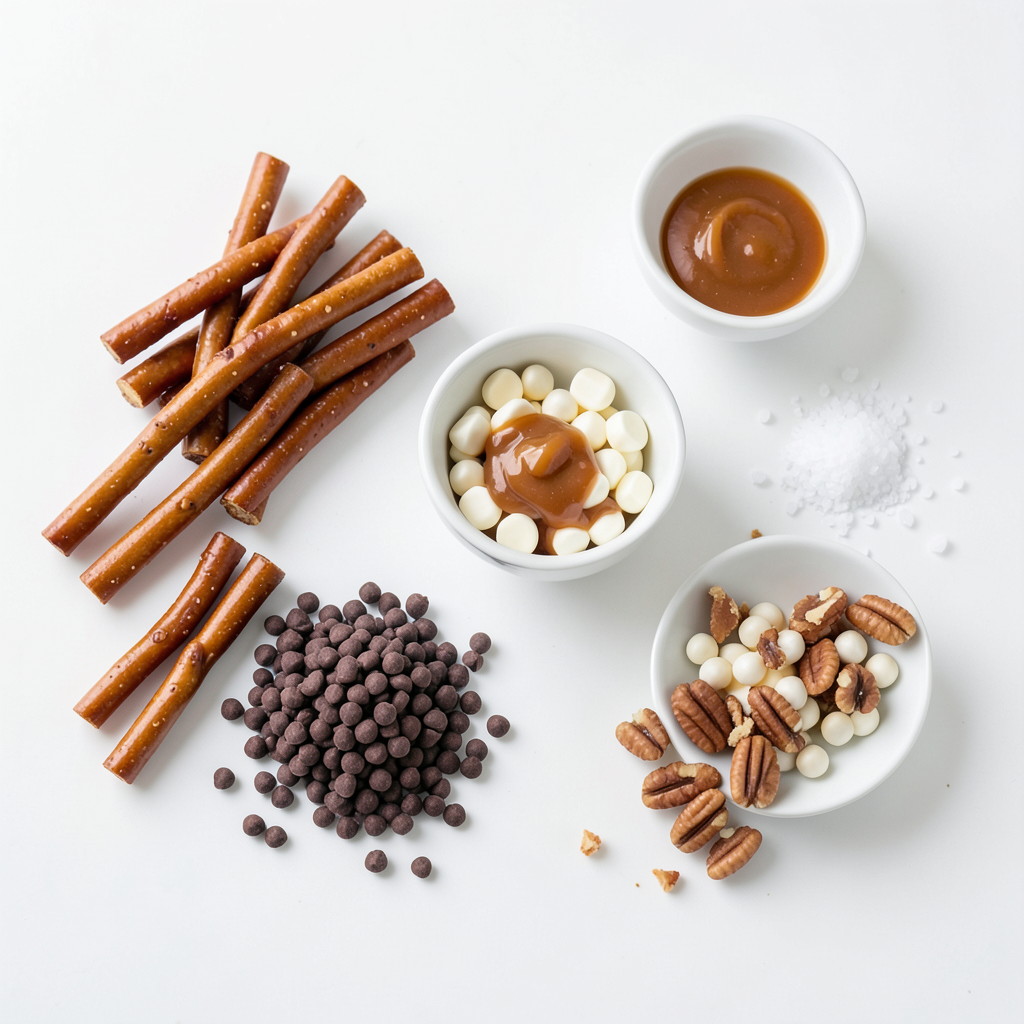
List of Ingredients
- 2 cups pretzel sticks
- 1 cup semi-sweet chocolate chips
- 1 cup white chocolate chips
- ½ cup caramel sauce
- ¼ teaspoon sea salt
- ½ cup crushed nuts (such as pecans or almonds)
- Optional: sprinkles or sea salt flakes for topping
Measurement Conversions
- 1 cup = 240 ml
- ½ cup = 120 ml
- ¼ teaspoon = 1.25 ml
Suggested Ingredient Substitutes
- For pretzel sticks, try mini pretzels or pretzel bites.
- Use dark chocolate chips instead of semi-sweet for a richer taste.
- Swap white chocolate chips with yogurt-covered raisins for a fruity twist.
- If you need a nut-free option, try seeds like pumpkin or sunflower instead.
- For a vegan version, use dairy-free chocolate and caramel.
Step-by-Step Instructions
Preparation Overview
To make Sweet and Salty Pretzel Bark, gather your ingredients first. You’ll need pretzel sticks, chocolate chips, caramel sauce, and nuts. Having everything ready helps you stay organized. Preheat your oven to 350°F (175°C). Line a baking sheet with parchment paper for easy cleanup.
Detailed Cooking Instructions
1. Arrange the Pretzels: Spread the pretzel sticks on the lined baking sheet. Keep them in a single layer. This helps the chocolate coat them well.
2. Melt the Semi-Sweet Chocolate: Place the semi-sweet chocolate chips in a bowl. Microwave them for 30 seconds at a time. Stir after each time until the chocolate is smooth.
3. Coat the Pretzels: Drizzle the melted chocolate over the pretzels. Use a spatula to spread it evenly. Make sure all pretzels are coated.
4. Bake to Set: Put the baking sheet in the oven. Bake for about 5 minutes. This will help the chocolate set without hardening.
5. Melt the White Chocolate: In another bowl, melt the white chocolate chips like you did with the semi-sweet chocolate. Stir until creamy.
6. Add the White Chocolate: Take out the baking sheet. Drizzle the white chocolate over the layer of pretzels and semi-sweet chocolate. Use a knife to swirl them for a marbled look.
7. Finish with Caramel and Nuts: Drizzle caramel sauce over the top. Quickly sprinkle the crushed nuts and sea salt on. This adds that sweet and salty mix.
8. Add Extra Toppings: If you want, add colorful sprinkles or more sea salt for fun.
9. Chill Until Firm: Place the baking sheet in the fridge for about 30 minutes. Wait until the bark is firm. Then, break it into pieces for a rustic look.
Tips for Melting Chocolate
When melting chocolate, use a microwave-safe bowl. This helps avoid burning. Stir often to ensure even melting. If you prefer, melt chocolate over a double boiler for more control. Remember, chocolate can seize if water gets in. Keep everything dry for the best results.
Tips & Tricks
How to Achieve the Perfect Texture
To get the best texture for your pretzel bark, start with fresh pretzel sticks. They should be crunchy and firm. When you melt your chocolate, avoid overheating it. Stir often to keep it smooth. After baking, let the chocolate cool slightly before adding the caramel. This helps keep layers distinct. Finally, chill the bark until it’s set. This will give you a nice, crisp bite.
Optional Toppings and Add-ins
You can add fun toppings to your pretzel bark. Consider using crushed candies for color and crunch. Mini marshmallows can add a soft, sweet touch. If you want more saltiness, sprinkle some extra sea salt on top. You might also like to use colored sprinkles for a festive look. You can mix different nuts, like almonds and pecans, for variety.
Troubleshooting Common Issues
If your chocolate clumps, it may be too hot. Always melt it slowly. If the caramel pools at the bottom, drizzle it gently and quickly after the chocolate. This helps it stick better. If your bark breaks unevenly, use a sharp knife to cut it. For a smoother top, use a spatula to spread the chocolate evenly. If you have sticky pieces, chill them longer before breaking.
Pro Tips
- Use Quality Chocolate: Opt for high-quality chocolate chips for the best flavor. The chocolate is a key component, so choose brands that you enjoy eating on their own.
- Chill for Perfect Texture: Be sure to chill the bark until it is fully set. This will ensure a crisp texture that contrasts nicely with the chewy pretzels and creamy caramel.
- Customize with Nuts: Feel free to mix and match different types of nuts based on your preference. Pecans, almonds, or even walnuts can add a unique crunch and flavor profile.
- Experiment with Flavors: Try adding a dash of sea salt to the chocolate before it sets or using flavored caramel to create a different taste sensation in your pretzel bark.
Variations
Flavor Combinations
You can mix and match flavors for your pretzel bark. Try using dark chocolate instead of semi-sweet chocolate. For a fruity twist, add dried cranberries or cherries on top. You can also use different nuts like walnuts or macadamia nuts. If you enjoy spicy flavors, sprinkle some chili powder on top for a kick. Experimenting with flavors can bring new life to this classic treat.
Dietary Adaptations (gluten-free, vegan, etc.)
To make this bark gluten-free, choose gluten-free pretzels. Many brands offer tasty options. For a vegan version, swap the chocolate chips for dairy-free ones and use a plant-based caramel sauce. Check labels to ensure everything fits your needs. This way, everyone can enjoy the sweet and salty goodness without worry.
Seasonal and Holiday Themes
You can customize your pretzel bark for different seasons. For fall, add pumpkin spice to the chocolate. During winter, top with crushed candy canes for a festive touch. In spring, use pastel sprinkles to brighten up the bark. For summer, try adding toasted coconut for a tropical vibe. These small changes can make your treat special for any occasion.
Storage Info
Best Storage Practices
Store your sweet and salty pretzel bark in an airtight container. Use parchment paper to separate layers. This keeps the bark fresh and prevents it from sticking.
How Long Does It Last?
When stored properly, pretzel bark lasts about two weeks. If you keep it in the fridge, it can last even longer. Just remember to check for any signs of spoilage.
Reheating Instructions
If your pretzel bark loses its crunch, heat it gently. Place it in a warm oven at 200°F (93°C) for about five minutes. This will help restore its texture without melting the chocolate. Enjoy your treat fresh!
FAQs
Can I use different types of nuts?
Yes, you can use different nuts! Pecans or almonds work great. You can also try walnuts or cashews. Just make sure to crush them into small pieces. This way, they mix well with the chocolate and caramel. Each nut adds its own flavor and crunch to the bark.
Is it possible to add other candies?
Absolutely! You can add other candies for extra flavor. M&Ms, mini marshmallows, or toffee bits make great additions. Just sprinkle them on top after the chocolate and caramel. This adds fun colors and textures. You can mix and match based on what you like best!
How do I know when the chocolate is melted?
You know the chocolate is melted when it looks smooth and shiny. Stir it after every 30 seconds in the microwave. If there are still small lumps, keep microwaving in short bursts. Be careful not to overheat, as chocolate can burn easily. Once smooth, it’s ready to use!
This blog post covered all you need to know about making delicious treats. We started with the essential ingredients, including useful substitutes. Then, I shared clear steps for preparation and cooking, plus tips for melting chocolate. We also explored ways to achieve perfect texture, fun toppings, and common troubleshooting fixes.
Finally, I provided storage tips and answered frequently asked questions. Enjoy making your treats with confidence! You now have the knowledge to get creative and make delicious variations. Happy cooking!