If you're craving a sweet and tangy treat, Blackberry Lemon Scones are the way to go! These scones burst with fresh flavors and are easy to make. In this guide, I'll share my favorite recipe, along with tips to ensure your scones turn out perfect every time. Whether you want to impress guests or enjoy a cozy breakfast, these scones are sure to delight. Let’s dive into the delicious details!
Why I Love This Recipe
- Fresh and Vibrant Flavors: The combination of lemon and blackberry creates a delightful balance of tart and sweet, making each bite a burst of flavor.
- Easy to Make: With simple ingredients and straightforward instructions, these scones can be whipped up in no time, perfect for a quick breakfast or brunch treat.
- Perfect Texture: The light and flaky texture of the scones, enhanced by the cold butter and minimal mixing, ensures a bakery-quality result at home.
- Customizable Delight: Feel free to experiment with different fruits or add a lemon glaze for an extra touch of sweetness, allowing you to make this recipe your own.
Ingredients
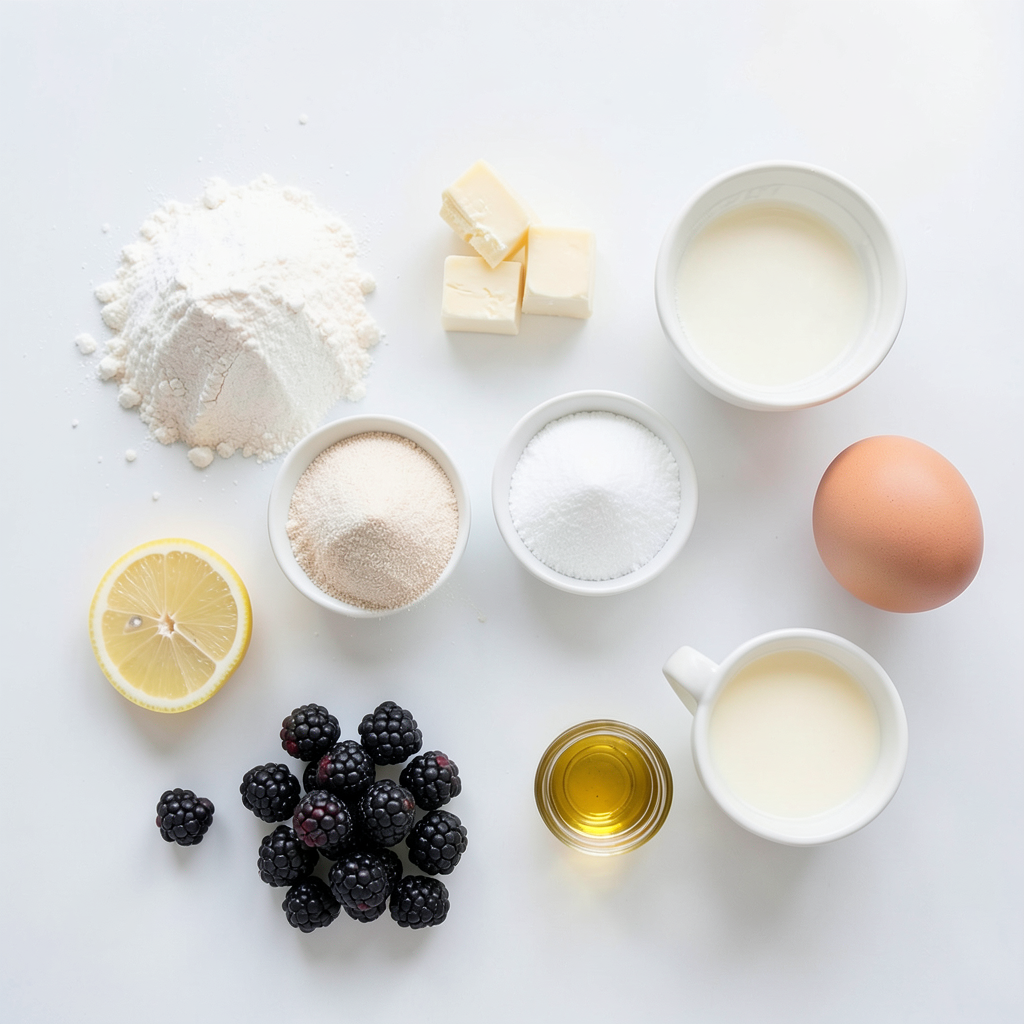
Complete Ingredients List
To make delightful blackberry lemon scones, gather the following items:
- 2 cups all-purpose flour
- 1/3 cup granulated sugar
- 1 tablespoon baking powder
- 1/2 teaspoon baking soda
- 1/2 teaspoon fine sea salt
- 1/2 cup unsalted butter, very cold and cut into small cubes
- 1/2 cup fresh blackberries, gently halved
- 1 tablespoon fresh lemon zest (from about 1 medium lemon)
- 1/2 cup buttermilk (or milk with a splash of vinegar)
- 1 large egg, at room temperature
- 1 teaspoon pure vanilla extract
Tips for Selecting Quality Ingredients
Choosing quality ingredients is key to great scones. Here are some tips:
- Flour: Use all-purpose flour for the best texture.
- Butter: Pick unsalted butter that is very cold. This helps the scones rise.
- Blackberries: Look for fresh blackberries that are plump and firm.
- Lemon: Use fresh lemons for zest. They add bright flavor.
- Buttermilk: If you can, use real buttermilk. It gives a nice tang.
Ingredient Substitutions
If you need to swap ingredients, here are some ideas:
- Flour: You can use whole wheat flour for a heartier scone.
- Butter: Coconut oil or vegan butter can replace the unsalted butter.
- Blackberries: Raspberries or blueberries work well if you can’t find blackberries.
- Buttermilk: Mix regular milk with a splash of lemon juice or vinegar as a substitute.
- Egg: For a vegan option, use a flax egg. Mix 1 tablespoon ground flaxseed with 2.5 tablespoons water.
These choices help you make tasty scones even if you don’t have all the exact ingredients. Enjoy your baking!
Step-by-Step Instructions
Prepping the Oven and Baking Sheet
Start by preheating your oven to 400°F (200°C). This step is key for even baking. Line a baking sheet with parchment paper. This helps your scones not stick and makes cleanup easy.
Combining Dry Ingredients
In a large bowl, mix together 2 cups of all-purpose flour, 1/3 cup of granulated sugar, 1 tablespoon of baking powder, 1/2 teaspoon of baking soda, and 1/2 teaspoon of fine sea salt. Whisk these ingredients well. This helps them blend for good rise in the scones.
Incorporating Butter and Blackberries
Add 1/2 cup of very cold, cubed unsalted butter to the flour mixture. Use your fingers or a pastry cutter to mix it in. Aim to create coarse crumbs. Leave some larger pieces for texture. Now, gently fold in 1/2 cup of halved fresh blackberries and 1 tablespoon of fresh lemon zest. Do this carefully to keep the blackberries whole.
Mixing Wet Ingredients
In another bowl, whisk together 1/2 cup of buttermilk, 1 large egg at room temperature, and 1 teaspoon of pure vanilla extract. Make sure this mixture is smooth.
Forming and Cutting the Dough
Pour the wet mixture into the dry mixture. Stir gently until just combined. Don’t overmix; it's fine if the batter is a bit lumpy. Turn the dough onto a lightly floured surface. Knead it gently just a few times until it holds together. Pat it into a circle that is about 1 inch thick. Cut this circle into 8 wedges.
Baking and Cooling Instructions
Transfer the wedges to your prepared baking sheet, leaving space between each. Bake for 15-20 minutes. Look for golden brown tops. A toothpick should come out clean from the center. Once baked, let the scones cool on the sheet for 5 minutes. Then, move them to a wire rack. This cooling step helps improve texture and taste.
Tips & Tricks
Achieving the Perfect Texture
To get the best texture in your scones, keep the butter very cold. This step helps create flaky layers. When mixing the butter with the flour, work quickly. You want coarse crumbs with some small chunks of butter still intact. Avoid overmixing the dough; it should be slightly lumpy. This will keep your scones light and airy.
How to Store Leftover Scones
Store leftover scones in an airtight container. This keeps them fresh for up to two days at room temperature. If you want them to last longer, freeze them. Wrap each scone in plastic wrap, then place them in a freezer bag. They can stay in the freezer for about three months. When ready to eat, just thaw them at room temperature or warm them in the oven.
Avoiding Common Mistakes
A common mistake is overworking the dough. This can make the scones too tough. Remember to handle the dough gently. Another issue is forgetting to preheat the oven. An oven that isn’t hot enough can lead to uneven baking. Lastly, make sure to leave space between the scones on the baking sheet. This allows them to rise and get that lovely golden color.
Pro Tips
- Keep Ingredients Cold: Ensure your butter and buttermilk are very cold. This helps create flaky layers in the scones.
- Don’t Overmix: Mix the wet and dry ingredients until just combined. Overmixing can lead to tough scones.
- Use Fresh Berries: For the best flavor and texture, use fresh blackberries. Frozen berries can make the dough too wet.
- Experiment with Flavors: Feel free to add other citrus zests or spices like cinnamon for a unique twist on the classic scone.
Variations
Suggested Flavor Combinations
You can make these scones even more fun! Try adding different fruits or spices. Here are some ideas:
- Blueberry and Lime: Swap blackberries for blueberries and add lime zest.
- Raspberry and Orange: Use raspberries and add orange zest for a citrus twist.
- Chocolate Chip: Mix in some chocolate chips for a sweet touch.
- Herbs: Add fresh herbs like mint or basil for a unique flavor.
Dietary Adjustments (Gluten-Free, Vegan)
You can enjoy these scones even with special diets! Here’s how to make them fit:
- Gluten-Free: Use a gluten-free flour blend instead of all-purpose flour.
- Vegan: Replace butter with coconut oil or vegan butter. Use plant-based milk instead of buttermilk and skip the egg.
Seasonal Fruit Alternatives
Seasonal fruits can change the vibe of your scones! Here are some ideas based on the seasons:
- Spring: Strawberries or cherries bring a fresh taste.
- Summer: Peaches or nectarines add sweetness.
- Fall: Apples or pears mixed with cinnamon give a cozy feel.
- Winter: Dried cranberries or pomegranate seeds can add a festive touch.
Feel free to experiment with these variations. It’s all about finding your favorite flavor!
Storage Info
Best Practices for Storing Scones
To keep your scones fresh, store them in an airtight container. This helps prevent them from drying out. You can place parchment paper between layers to avoid sticking. They stay best at room temperature for up to two days. If you want to keep them longer, consider freezing.
Freezing Instructions and Tips
To freeze scones, let them cool completely first. Place them in a single layer on a baking sheet. This prevents them from clumping together. Once frozen, wrap each scone tightly in plastic wrap. Then, put them in a freezer bag. This way, they can last for up to three months.
Reheating Suggestions
When you’re ready to enjoy your scones, preheat your oven to 350°F (175°C). Remove the scones from the freezer and unwrap them. Place them on a baking sheet. Bake for about 10 to 15 minutes, or until warm. You can also microwave them for about 15-20 seconds. Enjoy them warm for the best taste!
FAQs
Can I use frozen blackberries instead of fresh?
Yes, you can use frozen blackberries. They work well in scones. Just know they may bleed color into the dough. To prevent this, add them to the mix frozen. This keeps the scones looking nice.
How do I know when my scones are done baking?
Your scones are done when they turn golden brown on top. You can also use a toothpick. Insert it in the center. If it comes out clean, your scones are ready. This simple test helps ensure perfect texture each time.
What can I serve with Blackberry Lemon Scones?
These scones are great with tea or coffee. You can also add a light lemon glaze. A drizzle of glaze gives a sweet touch. Fresh fruit or whipped cream can enhance the dish, too. Try serving with a side of yogurt for a tasty contrast.
Can I prepare the dough in advance?
Yes, you can prepare the dough ahead of time. Form the scones and wrap them well. Store them in the fridge for up to 24 hours. When you are ready, bake them straight from the fridge. This makes fresh scones easy on busy mornings.
You now have a clear guide on making delicious blackberry lemon scones. We covered ingredient selection, step-by-step baking, and tips for success. Remember, quality ingredients lead to better results. Don’t forget to try different flavors and dietary options. Proper storage keeps your scones fresh. With these tips in hand, you can bake with confidence. Enjoy your baking journey and share those tasty scones with friends and family!